Pine Firewood Burning Guide: How to Burn Pine Safely and Get the Most Heat
Pine firewood gets a bad reputation, and most of it is undeserved. Burn it wrong — green, cold, and smoldering — and it will smoke, sputter, and coat your chimney with sticky creosote. Burn it right, and pine lights fast, smells wonderful, and keeps a lively fire going with almost no fuss. This guide walks you through picking, seasoning, and burning pine firewood so it works for you instead of against you.
By the end, you will know how to spot good pine, dry it to a safe moisture level, build a fire lay that burns clean, and keep creosote under control. You will also learn the mistakes that give pine its bad name, so you can skip them entirely. Let us get your firewood ready.
A note before you start: Wood smoke always carries some risk. Burn pine only in a properly vented fireplace or wood stove, and make sure your home has working carbon monoxide detectors. Have your chimney swept by a certified chimney sweep at least once a year, and check your local burn bans and air-quality rules before you light up. Never burn treated, painted, or stained pine lumber — the fumes are toxic.
What You Need
- Pine logs or rounds (fresh-cut or already seasoned)
- Chainsaw or bow saw for cutting to length
- Splitting axe, maul, or log splitter
- Wood moisture meter
- Chopping block (a sturdy stump works well)
- Pallets or rails to keep wood off the ground
- Tarp or cover for the top of the stack
- Kindling, tinder, and fire starters
- Fireplace screen or glass doors
- Gloves, safety glasses, and boots
At a Glance: The 7 Steps
- Identify and select seasoned pine splits
- Cut and split pine to fireplace size
- Stack pine off the ground to season it
- Test the moisture before you burn
- Build a top-down fire lay
- Burn hot and feed the fire often
- Sweep the chimney and clear the ash
1. Identify and Select Seasoned Pine Splits
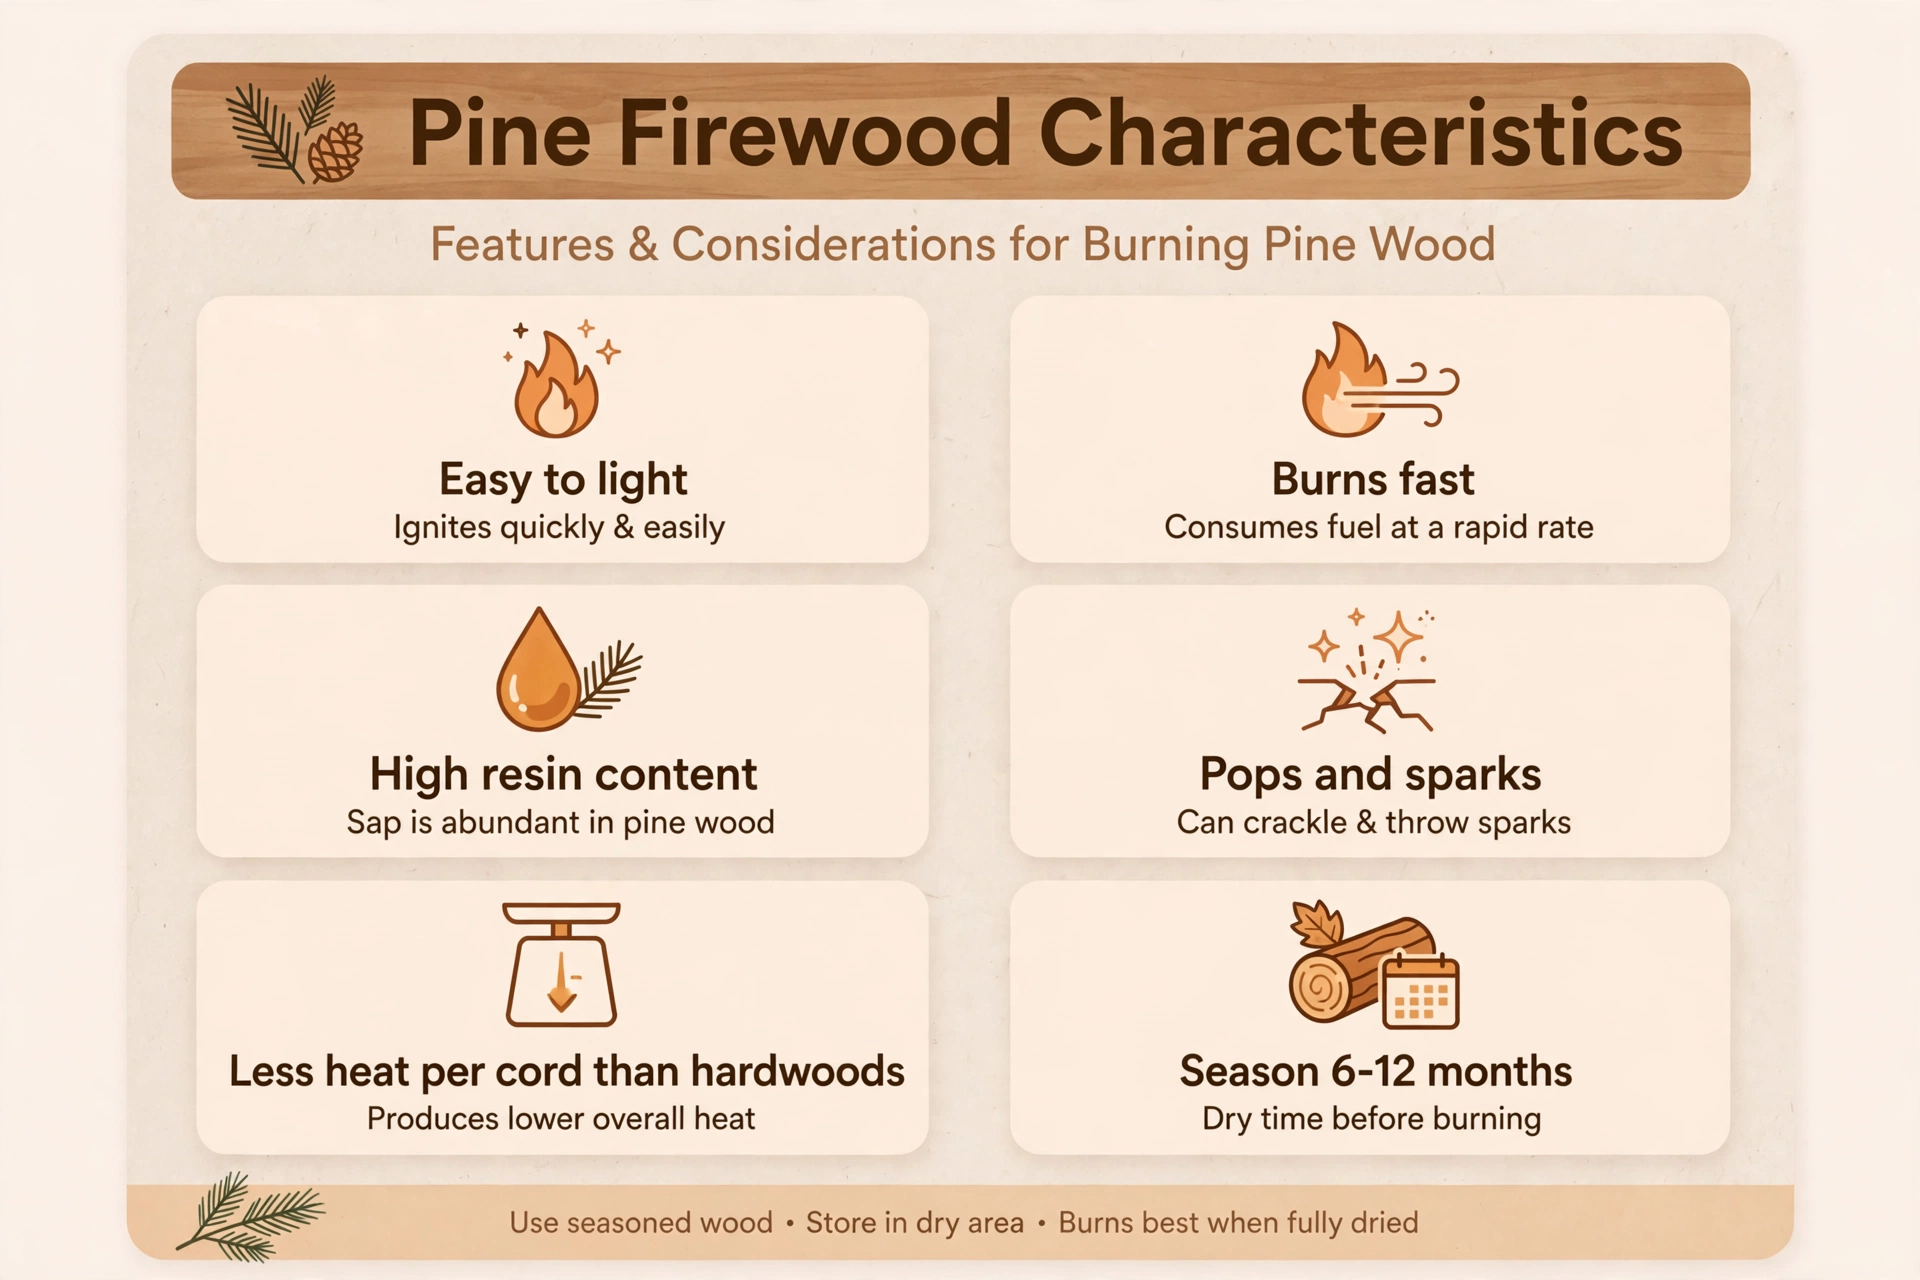
Good pine is easy to spot once you know the signs. Fresh-cut pine smells strongly of pitch, and its wood is pale yellow to creamy white. Pine that is ready to burn looks different: the ends are cracked and gray, the bark is loose or falling off, and each split feels light for its size.
Knock two splits together and listen. Dry pine gives a sharp hollow knock, like a baseball bat hitting wood. Wet pine makes a dull thud. If you are buying, ask when the wood was cut and split.
A seller should be able to tell you the month, rather than only saying “it is seasoned.” Wood cut this fall is not ready for winter fires.
One more check while you shop: if you want to compare pine with other common woods before you commit, see how it stacks up in our best firewood to burn ranking. Pine earns its place as a starter and shoulder-season wood, even if it is not the top overnight burner.
2. Cut and Split Pine to Fireplace Size
Pine rounds should measure 14 to 18 inches long for most fireplaces and wood stoves. Measure your firebox first, then subtract 3 inches so splits slide in without jamming against the walls. Oversized logs are a common reason fires smolder instead of burning.
Split each round into halves or quarters so no piece is wider than 6 inches across. Smaller splits catch fire faster and dry more evenly. Pine splits with very little effort compared to dense hardwoods like oak, so a maul and a chopping block are usually enough. Wear gloves and safety glasses, and keep kids and pets well clear of the splitting area.
If you bought your pine pre-cut and pre-split, you can skip this step. Still, check a few pieces with a tape measure. Bundles sold at gas stations often contain oversized pieces that choke the airflow in a small firebox.
Pro tip: Split pine while it is still green if you cut it yourself. Green pine splits cleanly along the grain, while pine that has sat in rounds for months dries unevenly and fights the maul.
3. Stack Pine Off the Ground to Season It
Even pine bought as “seasoned” benefits from a few weeks in a good stack. Pick a sunny, windy spot and lay pallets or rails so the wood sits 6 inches off the soil. Build rows no more than two splits deep so air flows through the pile.
Cover the top of the stack with a tarp or metal roofing, but leave the sides open. Trapping air around the wood slows drying and invites mold. For a full rundown of drying methods, see our guide on how to season firewood.
Pine is a fast dryer. Fresh-cut pine usually reaches safe moisture in 6 to 12 months, roughly half the time oak needs. Mark the date on a tag nailed to the pallet so you do not have to guess next winter.
4. Test the Moisture Before You Burn
Never trust looks alone. Press a moisture meter’s pins into the freshly split face of a piece, not the bark or the old ends. Readings should be under 20 percent before the wood goes anywhere near your fireplace.
Do not own a meter? Split a test piece and press the fresh face against your cheek. Dry pine feels warm and rough; wet pine feels cool and smooth.
Also watch for deep end cracks and bark that peels off in your hand. If you want more detail, our guide on how to tell if firewood is seasoned walks through every check.
Burning wood over 20 percent moisture wastes heat on boiling off water. The fire runs cooler, smoke rises, and creosote builds up in the flue much faster. With pine’s resin content, that combination is exactly what causes trouble.
5. Build a Top-Down Fire Lay
Pine burns cleaner from a top-down fire than from the classic teepee. Lay two large splits parallel on the grate with a 2-inch gap between them. Cross two more splits at right angles on top, then add a layer of kindling sticks crisscrossed the other way.
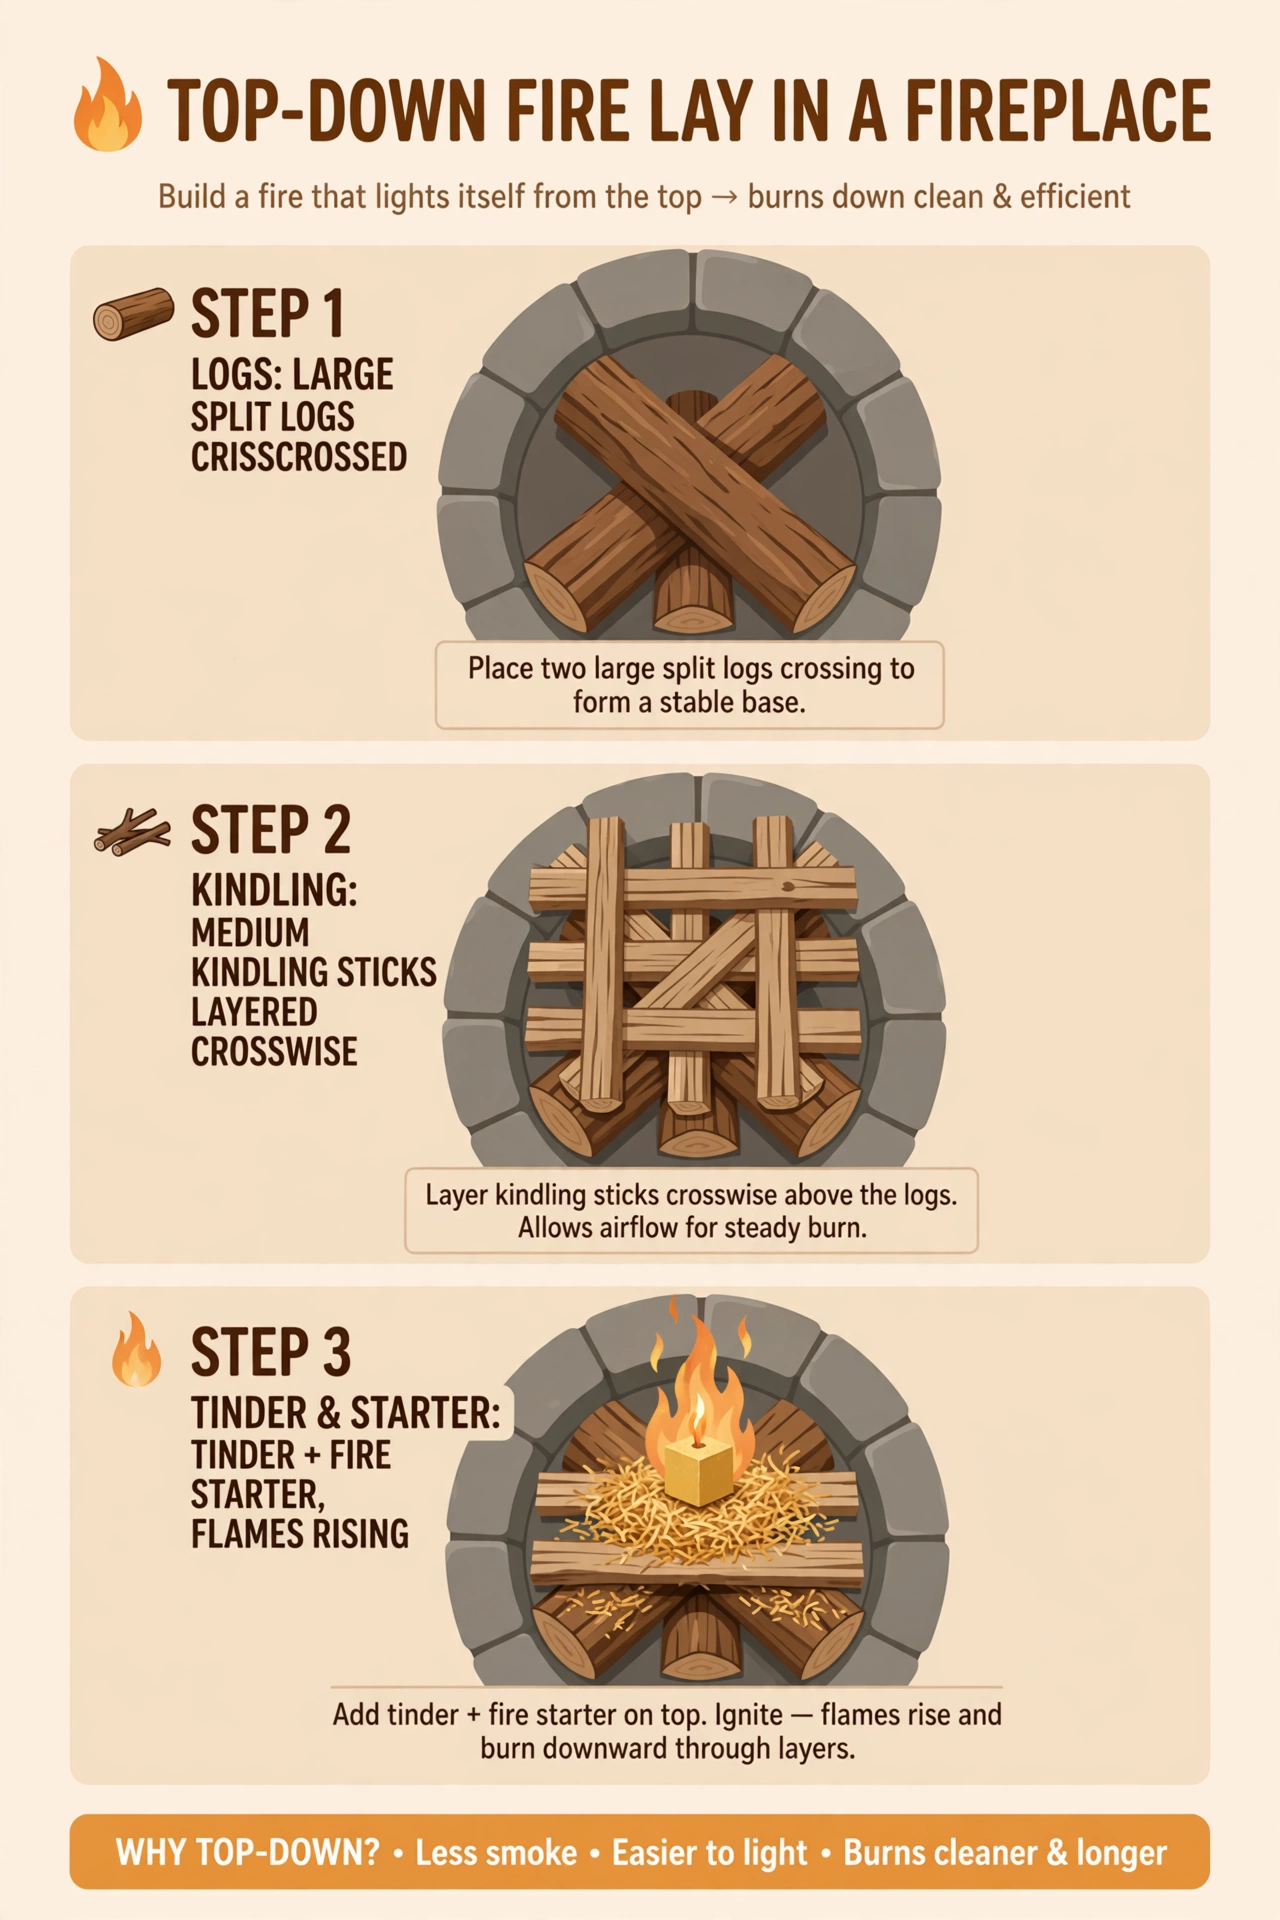
Nest a small ball of tinder — dry newspaper twists, wood shavings, or a commercial fire starter — on the very top. Light it and let the fire burn downward. The flame preheats the wood below, which means less smoke at startup and a stronger draft in the chimney.
Resist the urge to pack extra wood around the sides. Airflow is the whole point of this layout. If you are building the fire outdoors instead, the same top-down approach works in a pit — see how to start a fire in a fire pit for spacing and safety notes.
6. Burn Hot and Feed the Fire Often
A hot, lively pine fire is a safe pine fire. Keep the damper fully open during startup and leave it open while pine is the main fuel. Bright yellow flames that dance and crackle mean the wood is burning clean. Lazy, dark flames mean you are smoldering, and smoldering is where creosote comes from.
Pine burns fast, so plan to add 2 to 3 splits every 30 to 60 minutes to hold your heat. Add wood on top of glowing embers, not on dying ash. If the fire has burned down to mostly ash, rebuild with kindling rather than burying big splits in gray powder.
Heads up: Pine pops and throws sparks when resin pockets heat up. Always use a fireplace screen or keep glass doors closed while pine is burning. Never damper pine down to a smolder for the night — that cool, smoky burn coats your flue with the most dangerous kind of creosote, and it is the leading setup for a chimney fire. If you want overnight heat, switch to dense hardwoods instead.
7. Sweep the Chimney and Clear the Ash
Pine asks for a little extra chimney care. Book a certified chimney sweep at least once a year, and twice if pine is your main fuel. Creosote from resinous wood can build faster than you expect, and a pro can spot glazed buildup you cannot see from below.
After each fire, scoop out the ash but leave a 1-inch bed behind. That thin ash layer insulates the coals and makes the next fire light faster. Let ashes cool completely — at least 48 hours — before moving them to a metal container with a lid, stored outside and away from the house.
Between sweeps, glance up your flue with a flashlight once a month during burning season. Shiny black glaze or buildup thicker than 1/8 inch means call the sweep early. This habit takes two minutes and prevents the exact problem pine is blamed for.
Common Mistakes With Pine Firewood
1. Burning it green
Green pine is the source of almost every pine horror story. The moisture smokes, the resin steams, and your chimney takes the hit. Wait the full 6 to 12 months.
2. Dampering down for the night
Choking the air to make pine last longer turns it into a creosote factory. Pine is a daytime and evening wood — bright, fast, and fed often.
3. Burning pine lumber scraps
Construction offcuts, pallets, and old fencing are often pressure-treated or painted. Burning them releases toxic fumes. Stick to clean, untreated pine firewood.
4. Skipping the chimney sweep
Pine burners who sweep yearly almost never have creosote problems. Pine burners who do not sweep are the ones who do. Put the sweep on the calendar.
5. Expecting overnight coals
A full load of pine will be ash by morning. For overnight heat, start the fire with pine, then feed hardwoods on top once the coal bed is hot. Like softwood cousins, it compares well to cedar — see our cedar firewood burning guide for a similar profile.
Frequently Asked Questions
Can you burn pine firewood in a fireplace?
Yes. Seasoned pine is safe to burn in a fireplace when the fire burns hot and the chimney is swept yearly. The bad reputation comes from people burning green pine in smoldering fires, which is a bad idea with any wood.
Does pine create more creosote than hardwoods?
Pine’s resin can add to creosote, but fire temperature matters more than the wood species. Hot, seasoned pine with good airflow produces little creosote. Cool, smoky, smoldering pine produces a lot. Burn hot and sweep yearly.
How long does pine firewood need to season?
Plan on 6 to 12 months stacked off the ground with the top covered. Pine dries much faster than dense hardwoods like oak. A moisture meter reading under 20 percent is the real test — never burn by calendar date alone.
Why does pine pop and spark so much?
Pockets of resin inside the wood heat up, turn to vapor, and burst. This is normal for pine. Use a fireplace screen or glass doors, and keep rugs and furniture at least 3 feet from the hearth when burning pine.
Is pine good for overnight burns?
No. Pine burns fast and hot, so a full firebox is usually ash within a few hours. Use pine to start the fire and warm the flue, then add dense hardwoods if you need heat that lasts into the night.
Can you burn pine in a wood stove?
Yes, the same rules apply. Burn only seasoned pine under 20 percent moisture, keep the air controls open enough for a lively flame, and have the stove pipe inspected and cleaned yearly. Do not let pine smolder with the air choked down.
Quick Reference Card
Pick: Cracked ends, loose bark, light weight, hollow knock — or a moisture meter under 20%.
Size: Cut to 14–18 in, split to 6 in wide or less.
Season: Stack 6 in off the ground, top covered, sides open, 6–12 months.
Light: Top-down fire lay, tinder on top, damper fully open.
Burn: Hot and lively, add 2–3 splits every 30–60 min, use a screen.
Maintain: Sweep chimney yearly, leave 1-in ash bed, cool ashes 48 hrs in a metal can.
Never: Burn green pine, treated lumber, or damper pine down overnight.
Pine firewood rewards the basics: dry it well, burn it hot, and keep the chimney clean. Do those three things and pine stops being the scary wood — it becomes the wood that lights fastest, smells best, and gets every fire going.
Your next step is simple. Check your stack with a moisture meter this week. If it is under 20 percent, build one top-down fire and watch how clean it burns. You will see the difference on the very first try.