How to Build a Smokeless Fire Pit That Barely Smokes
You light the fire, pull up a chair, and the smoke follows you around the yard. Your eyes water. Your clothes smell like a campfire for days. If you know that dance, learning how to build a smokeless fire pit can change your nights outside.
A smokeless pit works by feeding the fire a second round of hot air. Cool air comes in low through holes in the outer wall. It warms as it rises in the gap between two steel walls. Hot air then jets out of holes near the top rim and burns off the smoke before it can drift into your face. You get tall, clean flames and far less smoke.
This guide walks you through the steel-drum build, the most common DIY path. You will end the weekend with a working pit, a test fire under your belt, and a clear plan for keeping it in good shape. Plan on one afternoon of work, about 4 to 6 hours, plus cooling time.
Safety note: Check local burn rules and burn bans before you build or light anything. Keep the pit well clear of your house, fences, and trees. Burn dry, untreated wood only. Never burn treated or painted wood, trash, or plastics. This guide is general information, not a permit or code approval. When in doubt, call your local fire department or a licensed pro.
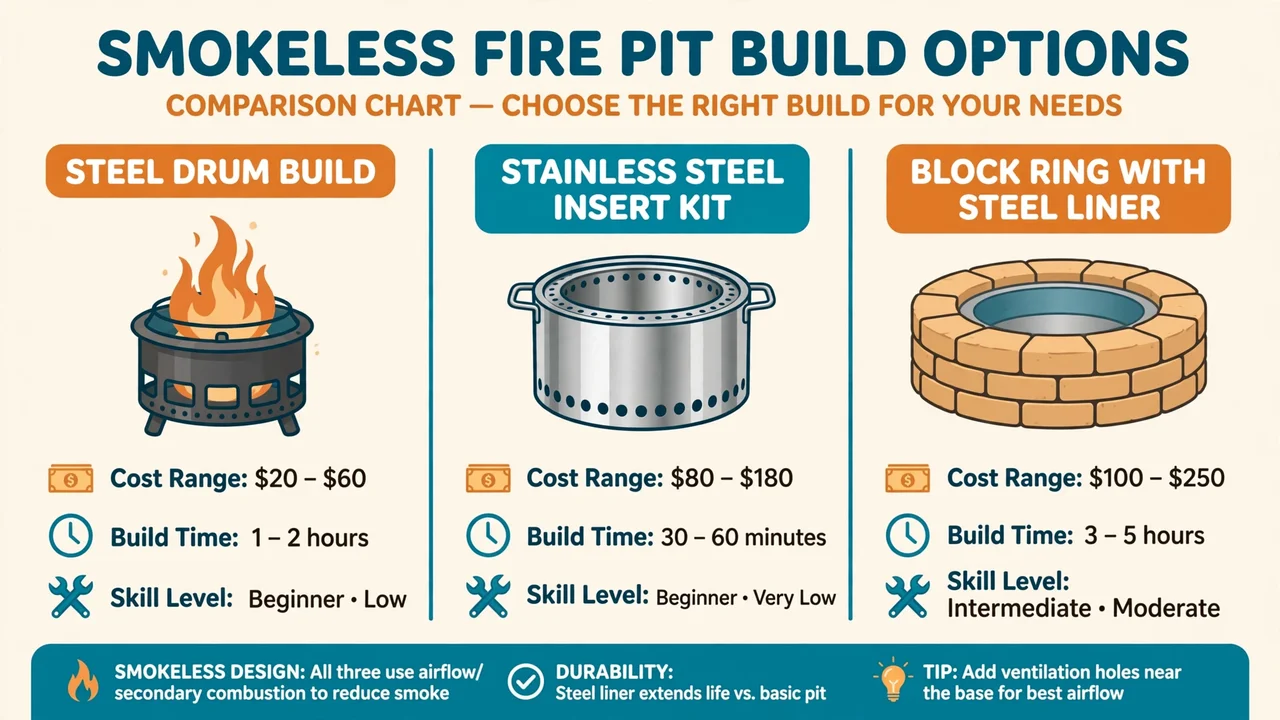
Three build paths exist: a steel-drum build, a stainless insert kit, or a block ring with a steel liner. This guide covers the steel-drum build because it costs the least and uses parts you can find locally. The chart below shows how the three paths stack up.
What You Need
Materials
- 55-gallon steel drum, clean and unlined (outer wall)
- 30-gallon steel drum or steel trash can (inner wall)
- 4 carriage bolts with nuts, 3/8 inch by 2 inches
- Steel fire grate or heavy mesh, about 18 inches across
- 1 bag of gravel and 8 to 12 patio pavers for the base
- Heat-resistant spray paint, optional
Tools
- Angle grinder with metal cutting discs
- Drill with 3/4-inch and 1-inch step drill bits
- Tape measure, marker, and metal file
- Work gloves, eye protection, hearing protection
- Socket wrench for the carriage bolts
- Bucket of water or a hose, kept close by
No angle grinder at home? A hardware store can cut the drum tops for a small fee, or a neighbor with a grinder can help. A jigsaw with a metal blade also cuts thin drum steel, though it takes longer.
Typical Cost (2026 Estimates)
Prices vary by town and by whether you buy new or used. Treat these as rough 2026 estimates, not quotes.
| Item | Amount | 2026 Estimate |
|---|---|---|
| 55-gallon steel drum (used, clean) | 1 | $20–$60 |
| 30-gallon steel drum or can | 1 | $15–$40 |
| Step drill bit set (3/4 in + 1 in) | 1 set | $25–$50 |
| Metal cutting discs | 3–4 | $10–$15 |
| Bolts, grate, gravel, pavers | As listed | $45–$80 |
| Project total | $115–$245 |
At a Glance
- Plan your spot and check the rules
- Pick the drums and cut the tops off
- Drill the bottom air holes
- Drill the top burn holes
- Set the inner drum and lock the air gap
- Build the base and set the grate
- Light the first test fire
- Cool, clean, and cover the pit
Before you pick up a tool, it helps to see the airflow path in one picture. Cool air enters low, warms in the wall gap, and burns the smoke off at the top. Every hole you drill serves that path.

Plan How to Build a Smokeless Fire Pit in Your Yard
Walk your yard with a tape measure. Pick flat ground at least 10 feet from your house, fence, shed, and tree branches. 25 feet is safer if you have the room. Look up, too. Low branches and power lines rule a spot out. For the full clearance numbers, read our guide on fire pit clearance from houses, trees, and fences.
Check your town or county rules and any burn ban in force. Some places limit open fires by season or by pit size. A quick call to your local fire department settles it in minutes. Mark the spot with four stakes and a string line so you can see the footprint before you haul steel.
- Measure 10 feet from the house and 25 feet if you can
- Confirm no burn ban and no local permit need
- Pick flat ground with no branches overhead
- Mark the spot with stakes and string
Pick the Drums and Cut the Tops Off
Buy drums that held food or nothing at all. Food-grade drums are the safe pick. Skip any drum with a chemical smell, a hazard label, or an unknown past. A drum that held fuel or solvent can hold fumes that flash when cut, even after rinsing. If the past of a drum is unclear, pass on it.
Heads Up: Never cut into a sealed drum. Open the bung caps and leave the drum open in fresh air for a full day before cutting. Keep a hose or a bucket of water within reach while you cut and grind.
Set the 55-gallon drum on its side and mark a cut line around the top rim. Cut the lid off with the angle grinder, slow and steady, and let the disc do the work. Do the same with the 30-gallon drum. File every cut edge smooth. Sharp drum edges cut gloves and hands fast.
- Open bungs and air the drums out for 24 hours
- Mark the cut line with a marker and a straight edge
- Cut both lids off and file the rims smooth
Drill the Bottom Air Holes
The bottom holes feed the fire its first air. Mark a ring on the outer drum 2 inches above the base. Drill twelve 1-inch holes around that ring, spaced about 4 inches apart. A step drill bit cuts clean holes in thin steel without grabbing. Hold the drill square to the wall and keep a firm grip.
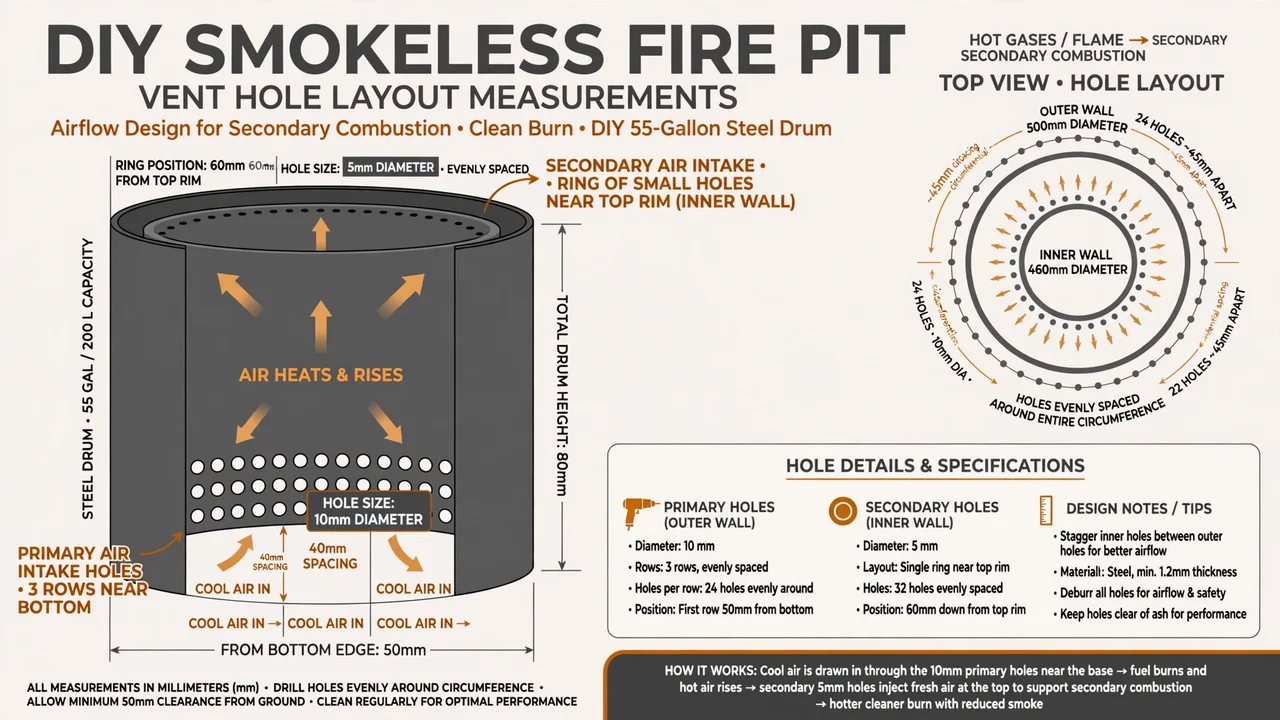
Deburr each hole with the metal file. Burrs snag gloves and block airflow. The table below gives the full hole plan for both rings, so you can check your work as you go.
Vent Hole Plan
| Hole Ring | Hole Size | Count | Position |
|---|---|---|---|
| Outer wall, bottom (air in) | 1 inch | 12 | 2 in above base, 4 in apart |
| Inner wall, top (air out) | 3/4 inch | 12–16 | 2–3 in below rim, 3 in apart |
More holes do not mean less smoke. Holes that are too big or too many cool the air stream and weaken the second burn. Stick to the sizes above.
Drill the Top Burn Holes
Switch to the inner drum. Mark a ring 2 to 3 inches below the rim. Drill twelve to sixteen 3/4-inch holes around that ring, about 3 inches apart. These holes sit above the fire line, so hot air jets out of them and meets the smoke right where it rises. That meeting point is where the second burn happens.
Work around the drum in order and count as you go. A missed hole shows up later as a dead spot with more smoke on one side. File each hole smooth, then tip the drum and shake out the metal chips. Chips left inside can block the air gap you build in the next step.
- Mark the ring 2 to 3 inches below the rim
- Drill 12 to 16 holes, 3 inches apart
- File smooth and shake out all metal chips
Set the Inner Drum and Lock the Air Gap
Lower the inner drum into the outer drum. The gap between the two walls should measure 1.5 to 2 inches all the way around. That gap is the chimney that heats the air. A gap that is too tight chokes the flow. A gap that is too wide lets the air stay cool.
Pro Tip: Cut four short spacers from scrap steel pipe, each 1.5 inches long, and wedge one between the walls at each quarter point. They hold the gap even while you drill the bolt holes.
Drill through both walls at four points near the top rim and fit a carriage bolt at each point. Tighten the nuts by hand, then a quarter turn with the wrench. Check the gap with the tape measure at all four points. Spin the inner drum a little if one side runs tight.
Build the Base and Set the Grate
Clear grass and roots from your marked spot and lay the pavers in a circle a few inches wider than the drum. Spread gravel between the pavers to level them. The base keeps the drum off wet ground, which slows rust, and it gives you a fire-safe ring around the pit. If you want a block ring around the base instead, check which blocks can take the heat in our guide to blocks that are safe for a fire pit.
Set the drum on the pavers and drop the grate inside so it rests 4 to 6 inches above the drum base. The grate lifts the wood off the floor so air can flow under the fire. Rock the drum by hand. If it wobbles, shim a paver until it sits flat.
- Clear grass and lay pavers wider than the drum
- Level with gravel and set the drum on top
- Rest the grate 4 to 6 inches above the base
- Shim until the drum sits flat with no wobble
Light the First Test Fire
Load the pit with a top-down lay: large splits on the bottom, medium splits crossed over them, kindling on top. Use dry, seasoned wood with moisture under 20 percent. Wet wood smokes no matter how good the airflow is. For the full list of what burns clean and what never goes in a pit, see what you can burn in a fire pit.
Light the kindling at the top and step back. The fire will look smoky for the first few minutes while the walls warm up. That is normal. Watch the rim as the drum heats: thin jets of flame should appear at the top holes and the smoke should fade to a faint shimmer. Let the test fire burn for 30 minutes and note any side that still smokes.
- Build a top-down lay with dry wood under 20 percent moisture
- Light the kindling and give the walls time to warm
- Watch for flame jets at the top holes
- Note any side that keeps smoking after 30 minutes
Cool, Clean, and Cover the Pit
Let the fire burn down on its own. Do not pour water into a hot steel drum; the shock can warp the walls. Wait until the ash feels cold to the back of your hand, which takes about 24 hours. Scoop the ash into a metal bucket with a lid and set it away from the house for a few days.
Brush out the inside walls and clear any hole that ash has blocked. A blocked hole starves the second burn on the next fire. Cover the pit with a metal lid or a fitted cover when rain is on the way. A dry pit lights faster and rusts slower. If you are still weighing a store-bought pit against this build, our guide on whether smokeless fire pits are worth it lays out the trade-offs.
Before: A Normal Open Pit
- Smoke chases you from chair to chair
- Eyes water and clothes hold the smell
- Wood burns fast with a lot of smoke
- You sit upwind or you sit elsewhere
After: Your Smokeless Build
- Tall flames with only a faint shimmer above
- You can sit on any side of the pit
- Dry wood burns hotter and cleaner
- Less smoke on clothes and hair
Troubleshooting
| If This Happens | Try This |
|---|---|
| Heavy smoke after 15 minutes | Check wood moisture. Burn dry wood under 20 percent and let the walls heat fully. |
| Flames die down fast | Clear the bottom holes. Ash or chips may block the air coming in low. |
| Smoke on one side only | Count the top holes on that side. Add any missing hole and check the gap is even. |
| Fire burns too fast | Use larger splits and load less wood at a time. Small, dry sticks burn out quick. |
| Rust shows after a season | Brush off loose rust, paint with heat-resistant paint, and keep the pit covered. |
Frequently Asked Questions
Does a DIY smokeless fire pit remove all smoke?
No. A good build cuts most of the smoke once the walls are hot and the wood is dry. You will still see some smoke at start-up and when you add cold wood.
What size drums work best?
A 55-gallon outer drum with a 30-gallon inner drum is the most common pair. It holds enough wood for a long evening fire. Smaller pairs work, but they hold less wood and need more frequent loading.
Can I use a plastic drum?
No. Plastic melts and burns, and it gives off fumes you should never breathe. Use steel only.
Do I need a permit to build one?
It depends on your town or county. Some places limit open fires by season or pit size. Check local rules and any burn ban before you build or light a fire.
How long will the steel last?
A few seasons with basic care. Keep it covered, clear the ash, and touch up bare spots with heat-resistant paint. Rust is normal wear on a steel pit, not a sign of failure.
Quick Reference Card
Build: 55-gal outer drum + 30-gal inner drum, 1.5–2 in air gap. Holes: twelve 1-in holes low on the outer wall, 12–16 3/4-in holes high on the inner wall. Wood: dry, seasoned, under 20 percent moisture. Clearance: at least 10 ft from house, fence, and trees; 25 ft is safer.
- Plan your spot and check the rules
- Pick the drums and cut the tops off
- Drill the bottom air holes
- Drill the top burn holes
- Set the inner drum and lock the air gap
- Build the base and set the grate
- Light the first test fire
- Cool, clean, and cover the pit
You did it. You now know how to build a smokeless fire pit with your own hands, and you have a test fire to prove it works.
Invite a few friends over this weekend and let them pick any chair. The smoke will stay out of their faces, and the fire will do the talking. For a plain open pit to compare against, or a seating area to build around your new pit, see our guide on how to build a fire pit.