How to Build a Solar Kiln for Drying Firewood: A Weekend Build That Dries Wood Faster
Wet firewood hisses, smokes, and leaves your fire struggling. You stack it, you wait, and months later it still feels damp in the middle. A solar kiln for drying firewood changes that wait by trapping sun heat and moving air through the stack on purpose, instead of leaving drying to chance.
By the end of this guide, you will have a small, clear-roofed kiln that holds a working stack of split wood, pulls in dry air low, and vents damp air high. You will know how to load it, when to check it, and how to tell when the wood is ready to burn. The build uses common lumber, clear plastic sheeting, and basic tools, and most people can finish the frame in a weekend.
This is a drying aid, not a fire or a heater. The kiln holds no flame, and you never light a fire inside it. Read the safety notes before you cut anything, and check your local rules about structures, firewood movement, and burning.
Safety first — read before you build
Wear eye and ear protection, gloves, and sturdy boots when you saw, drill, or lift lumber. Keep children and pets clear of the work area. Build on stable, level ground so the kiln cannot tip. Never burn treated, painted, or stained wood, plywood, or household trash — the fumes are toxic. Check local burn rules and firewood transport rules before you move wood, since pests and quarantines vary by area.
TOTAL TIME
One weekend to build; weeks to dry
ACTIVE TIME
6–8 hours of building
DIFFICULTY
Beginner with basic tools
What you need
- Pressure-treated lumber for the base frame: four 8-foot boards and four 4-foot boards, plus posts for the walls
- Untreated lumber for the upper frame and roof frame
- Clear greenhouse plastic sheeting, at least 6 mil thick, large enough to cover the roof with overlap
- Black landscape fabric or dark ground cover for the floor, to absorb heat
- Gravel for a level base, about 4 inches deep under the kiln
- Exterior screws, a drill, a circular saw or hand saw, a tape measure, and a level
- Staples or battens for fixing plastic, plus a staple gun
- Two adjustable vents or louvred vent covers, one low and one high
- A pin-type moisture meter for checking split wood
- Work gloves, eye protection, ear protection, and a dust mask
- Split firewood, cut to 16 inches or to fit your stove or fireplace
At a glance
- Choose a sunny, level spot
- Lay a level gravel base
- Build the floor frame
- Raise the side walls
- Frame the sloped clear roof
- Cover the roof with clear plastic
- Cut low inlets and high outlets
- Stack split wood with air gaps
- Test moisture and rotate the stack
How a solar kiln for drying firewood works
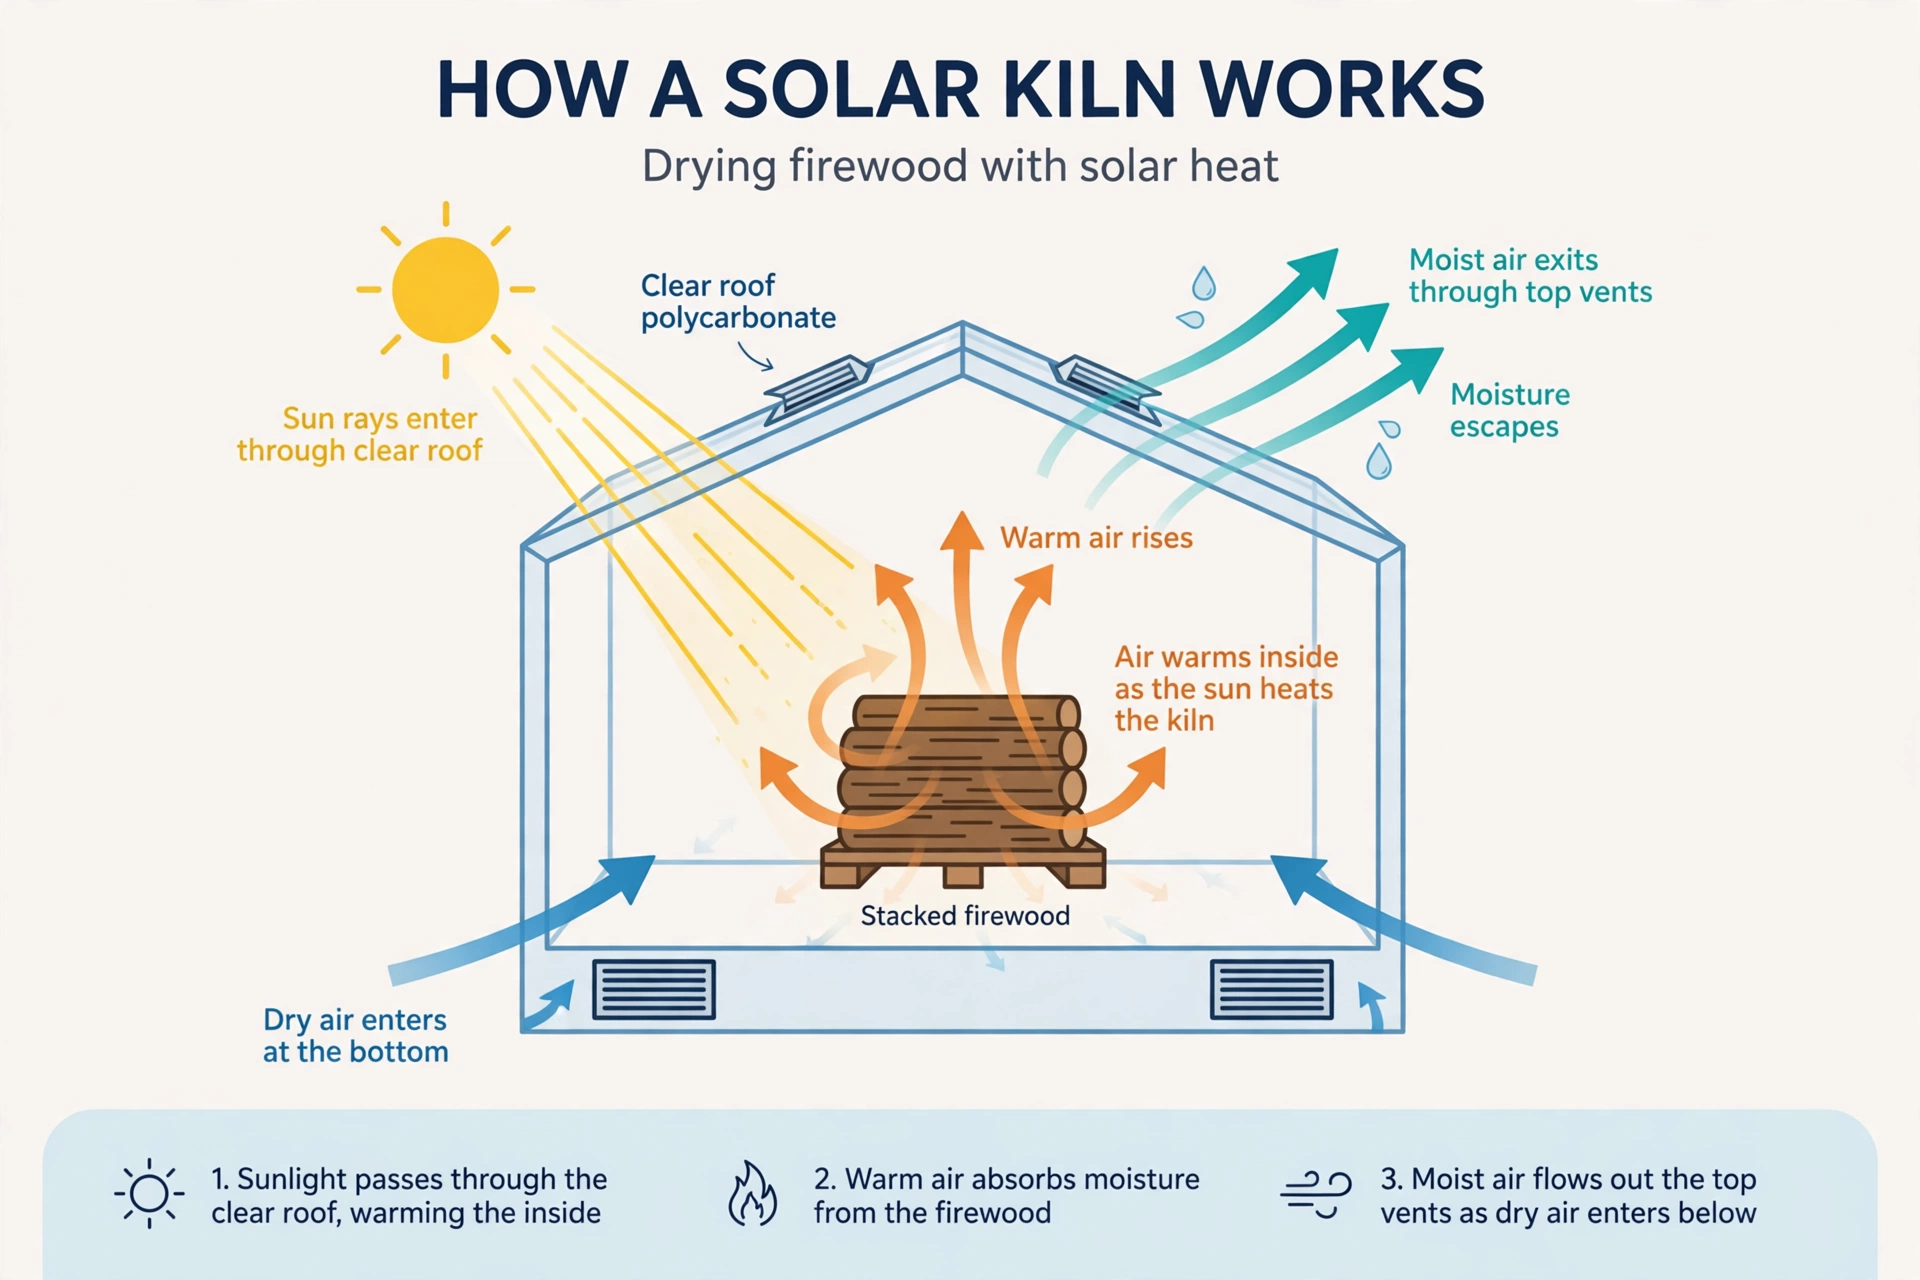
Sunlight passes through the clear roof and warms the air and wood inside. Warm air can hold more moisture than cool air, so it pulls water out of the split faces of the wood. That damp, warm air then needs a way out, or it will sit inside the kiln and slow drying.
That is why vent placement matters more than fancy materials. Cool, drier air enters low, warms as it crosses the stack, and leaves high through the top vents. On a sunny day the inside of the kiln can climb well above the outside air temperature, which speeds the process compared with an open stack in shade.
Drying time still varies. Species, piece size, starting moisture, weather, and airflow all change the result. A moisture meter gives you a real answer instead of a guess, and that meter reading is what decides when wood moves from the kiln to your woodpile.
Choose a sunny, level spot
Walk your yard at midday and look for the spot that gets sun for the longest stretch, with the long side of the kiln facing south in the Northern Hemisphere. Shade from a fence, shed, or tree will cut heat fast, so pick the open spot even if it is a short walk from the house.
Check that the ground drains after rain. A low spot that holds water will keep the base damp and invite rot. If your only sunny spot is soft ground, plan for extra gravel and a firmer frame base before you start cutting lumber.
Lay a level gravel base
Mark a rectangle 8 feet long by 4 feet wide and clear grass, roots, and loose debris from inside it. Spread gravel about 4 inches deep across the rectangle, then rake it flat and tamp it firm with a hand tamper or the flat back of a shovel.
Set a level on the gravel in both directions and adjust high spots before you build. A level base keeps doors, vents, and stacks square, and it stops the kiln from rocking when you load heavy wood. Skipping this step shows up later as a roof that will not sit flat.
Build the floor frame
Pressure-treated lumber belongs here, since this frame sits close to damp ground. Cut two 8-foot side rails and three 4-foot cross pieces, then screw them into a flat rectangle with one cross piece in the middle for support.
Lay black landscape fabric over the frame area before you set the frame down, and trim the excess. The dark surface absorbs heat and blocks weeds, while the gravel below still lets water drain away from the wood.
Set the frame on the gravel and check it with a level again. Shim low corners with flat stones or extra gravel until the frame sits firm with no rocking.
Raise the side walls
Cut corner posts to 4 feet at the back and 5 feet at the front, so the roof will slope toward the back for rain runoff. Screw one post at each corner of the floor frame, and brace each post with a short diagonal piece while you work.
Add a top rail along each long side, joining the tall front posts to the shorter back posts. That sloped rail is the line your roof will follow, so measure both sides and match them before you move on.
Leave the front open for loading, or fit a simple framed door that you can lift off. An open front makes stacking far easier, and you can close it later with a clear plastic flap if wind drives rain inside.
Pro tip
Number your posts with a pencil as you cut them: front-left, front-right, back-left, back-right. When the pieces look alike on the ground, those marks stop a tall post ending up at the back and ruining your roof slope.
Frame the sloped clear roof
Cut roof joists to span the 4-foot width, with a few inches of overhang on each side so rain drips clear of the walls. Space the joists about 24 inches apart and screw them to the sloped top rails.
Sight along the joists from the side before you fix the plastic. Every joist should sit on the same slope, with no high joist poking up to stretch or tear the sheeting. A straight roof sheds water and holds plastic tight in wind.
Cover the roof with clear plastic
Unroll the clear plastic over the roof frame on a calm day, with at least 6 inches of overhang on all sides. Pull it snug, but not so tight that it drums and strains at the staples when the sun warms it.
Staple the plastic along one long side first, then pull across and staple the other side, working from the middle outward. Cover the stapled edges with thin wooden battens screwed over the plastic, which spreads the grip and stops wind from tearing the sheet at the staple line.
Trim the excess with a sharp knife, leaving the overhang in place. That overhang is your drip edge, and cutting it flush invites water to run down the walls and into the stack.
Heads up
A closed kiln in full sun gets hot inside. Never climb inside to adjust a stack on a hot, sunny day, and keep children and pets out of the kiln. Open the front and let it cool and air out first, and wear gloves when you handle wood that has been sitting in trapped heat.
Cut low inlets and high outlets
Airflow is what turns a plastic box into a kiln. Cut one low inlet opening near the base on the shaded or windward side, and one high outlet near the top of the opposite end, each about 12 inches by 6 inches to start.
Fit a louvred vent cover or a simple flap over each opening so you can narrow or widen the airflow. On damp, still days, wider vents help damp air escape. On hot, windy days, narrowing the outlet keeps heat inside longer while air still moves.
If the inside of the plastic stays fogged all day, your vents are too small or blocked by stacked wood. Widen the outlets a little, clear the path in front of the vents, and check again the next sunny day.
Stack split wood with air gaps
Split wood dries far faster than round logs, because the split faces expose the inside of the wood to warm air. Split your logs before loading, and keep pieces close to the same length so the stack stays stable.
Stack in rows with a finger-width gap between pieces, and leave a clear channel in front of each vent. Do not pack the kiln tight to the plastic, since wood touching plastic traps moisture and can stain or rot at the contact point. Leave at least a few inches of space at the top for warm air to move.
Burning wet firewood causes smoke, low heat, and creosote buildup, so the time you spend stacking with gaps pays off at the fireplace. If you need more wood while this batch dries, see where to buy firewood and ask the seller how the wood was dried and stored.
Test moisture and rotate the stack
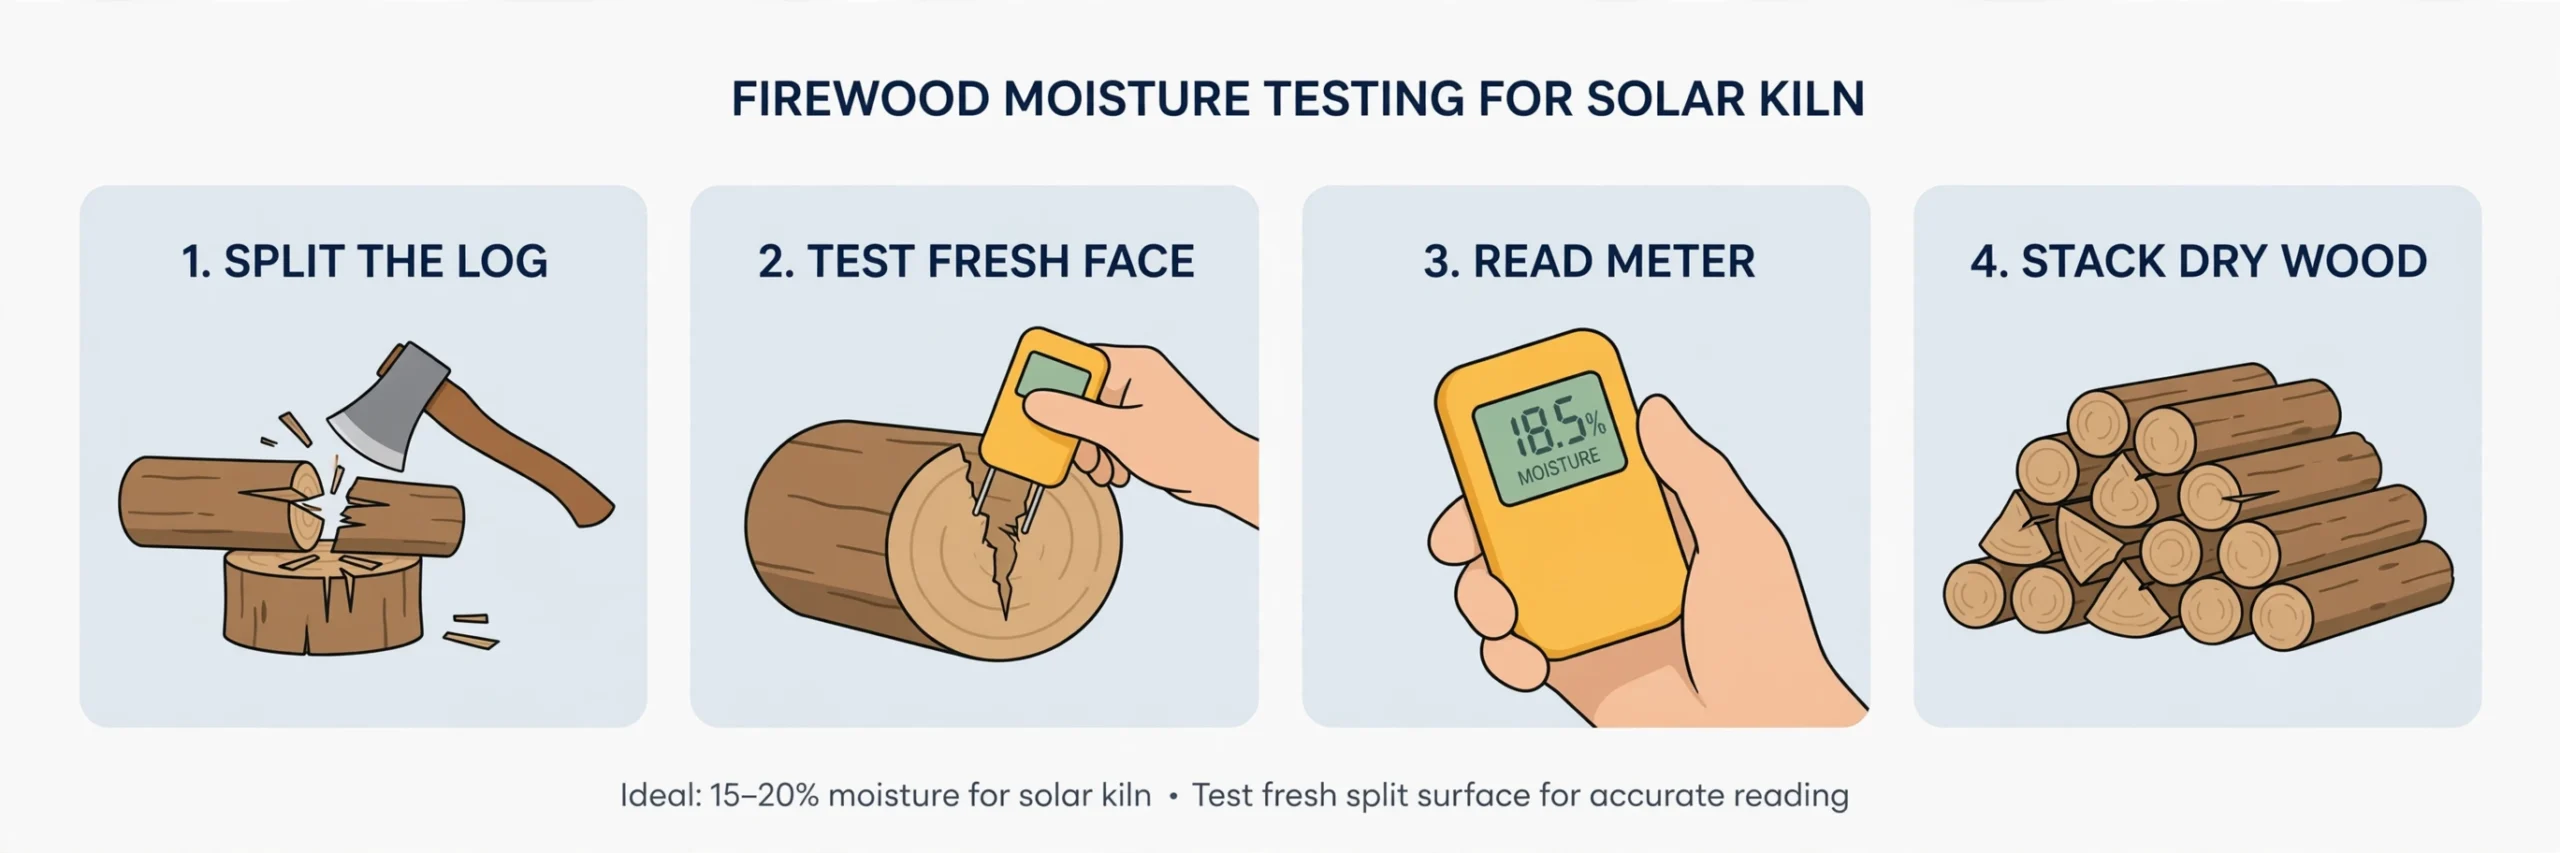
After two weeks in the kiln, split one test piece from the middle of the stack and press the moisture meter pins into the fresh face, not the old outside. The fresh face gives the reading that matters, since the outside can feel dry while the centre is still damp.
Many guides point to wood under 20% moisture as ready to burn, and that is a sound target for most home fireplaces and stoves. If your reading is above that mark, close the kiln, leave the vents open a crack, and test again in a week.
When the outer rows test dry but inner rows lag, swap them. Move the dampest pieces to the sunniest, best-ventilated spot in the kiln and shift dry pieces to the woodpile. For help reading the signs of dry wood, read how to tell if firewood is seasoned.
Keep a small notebook by the kiln with the load date, species, and meter readings. Those notes tell you, next season, which wood dried fastest in your yard and how long your kiln truly needs for each species.
Troubleshooting
Before and after: what to expect
Before the kiln
Fresh-split wood that hisses in the fire, smokes, and needs constant tending to stay lit.
After kiln drying
Wood that lights with less smoke, burns hotter, and tests under 20% moisture on the fresh face.
Frequently asked questions
How long does firewood take to dry in a solar kiln?
Drying time varies by species, piece size, starting moisture, and weather, so no single week count fits every load. Many loads need several weeks in sun and airflow, and a moisture meter reading under 20% is the test that confirms readiness.
Can a solar kiln dry wood too much?
Wood can dry below the level that burns well in some stoves, and very dry wood can burn fast and hot. If you wonder whether wood can go too far, read can firewood be too dry before you burn a full load of kiln-dried wood.
Do I need a fan in a solar kiln?
No fan is required for a small kiln with good low inlets and high outlets, since warm air rises on its own. A small solar fan can help on still, humid days, but vents placed low and high matter more than a fan.
What plastic should I use for a solar kiln roof?
Use clear greenhouse plastic at least 6 mil thick, since thin painter plastic tears fast and clouds quickly. Clear plastic lets sun heat pass through, while dark or opaque covers block the heat you need.
Can I leave firewood in the kiln over winter?
Yes, if the kiln stays sound and the wood stays dry, but check the plastic after storms and clear snow load from the roof. Move finished wood to a covered woodpile before the burning season so the kiln is free for the next load.
Quick reference card
Need: lumber, clear 6 mil plastic, gravel, vents, moisture meter, PPE.
Size: 8 ft by 4 ft base, sloped clear roof, low inlet plus high outlet.
- Choose a sunny, level spot
- Lay a level gravel base
- Build the floor frame
- Raise the side walls
- Frame the sloped clear roof
- Cover the roof with clear plastic
- Cut low inlets and high outlets
- Stack split wood with air gaps
- Test moisture and rotate the stack
Ready test: split a test piece and check the fresh face — under 20% moisture.
Your kiln is done when the frame is square, the roof is tight, the vents are clear, and the first stack is loaded with air gaps. That first load will teach you more than any guide can, because your sun, wind, and wood are the real variables.
Keep testing with the meter, keep notes on each load, and store finished wood under cover. A solar kiln for drying firewood rewards steady habits: load it in sun, vent it well, and burn only wood that has truly dried.