Patio Heater Thermocouple: How to Clean, Test and Replace It
You hold the knob down, the pilot catches, and the second you let go it dies. You try again. Same result. That maddening flame-out is the signature of a patio heater pilot that refuses to stay lit — and the thermocouple is the usual suspect.
The thermocouple is a small copper probe that sits in the pilot flame. Its one job is to tell the gas valve “yes, there is a flame here” by producing a tiny electric current when it gets hot. When the tip is dirty, bent, or worn out, that signal gets weak and the valve shuts the gas off to protect you.
By the end of this guide you will have cleaned that probe, tested it with (or without) a multimeter, and replaced it if it is dead. The whole job takes about 45 minutes for a beginner, needs only basic hand tools, and costs far less than a new heater.
Safety first: this job involves a propane gas appliance. Work outdoors only, shut the propane off at the tank, let the heater cool completely, and never work on a live gas connection. Brush soapy water over every joint you reconnect and watch for bubbles before lighting anything. If you smell gas, see damaged parts, or feel unsure at any point, stop and call a licensed gas professional.
- Fine steel wool or 220-grit sandpaper
- Clean dry cloth
- Adjustable wrench
- Digital multimeter with a millivolt (mV) setting (borrow one if needed)
- Replacement universal thermocouple, matched to your old one’s length
- Dish soap mixed with water in a small cup, plus a brush or sponge
- Your heater’s manual (for the pilot assembly layout)
Shut Off the Gas and Let the Heater Cool Completely
The heater must be stone cold and fully disconnected from gas before you touch the pilot assembly. Turn the propane tank valve clockwise until it stops, then disconnect the tank and set it a few feet away. Give the heater at least 30 minutes to cool — longer if it was running recently.
Touch the reflector and the emitter screen to confirm they are cool to the hand. Use the waiting time to lay out your tools where you can reach them.
If you smell gas at any point — rotten-egg odor — do not light anything and do not hunt for the leak with a flame. Move everyone away from the heater and call your gas supplier or fire department from a safe distance. A leak check is done with soapy water only, never with a match.
Find the Thermocouple in the Pilot Assembly
The pilot assembly hides behind a small access door or panel at the base of the heater, usually near the control knob. Most panels lift or slide off with no tools at all.
Look for the pilot burner — a small metal nozzle. Beside it sits the thermocouple: a thin copper-colored probe on a flexible metal tube. That tube runs down to the gas valve. This is the probe you will clean and test, so take a good look at how it is routed before touching anything.
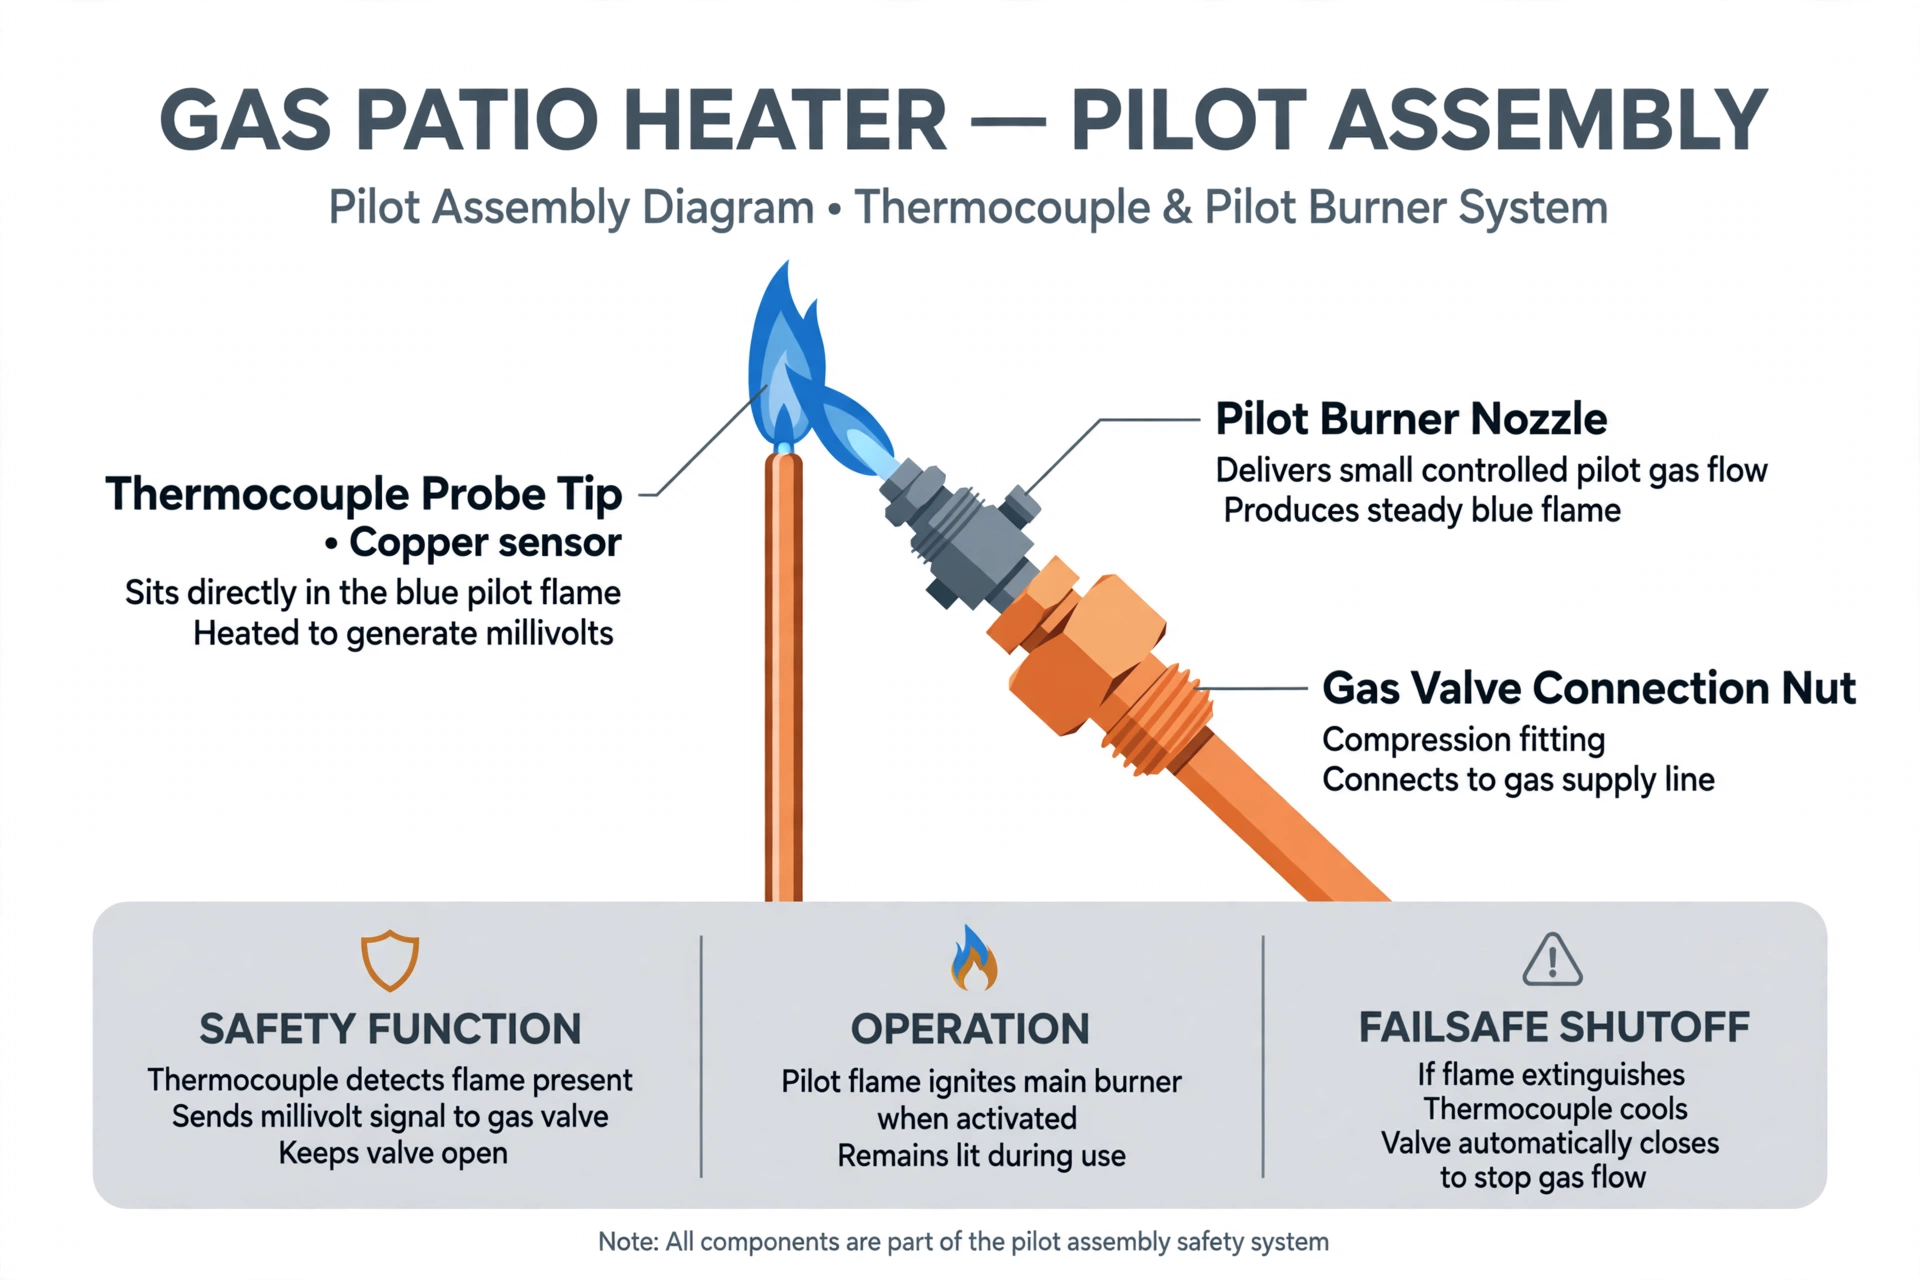
A quick sense of how a patio heater works helps here: the thermocouple is the safety link between the pilot flame and the gas valve.
Clean the Patio Heater Thermocouple Tip
Soot and corrosion on the tip are the most common reason a thermocouple stops working. Rub the probe tip lightly with fine steel wool or 220-grit sandpaper, working in one direction for about 15–20 seconds. You want a bright copper shine — not a deep scratch.
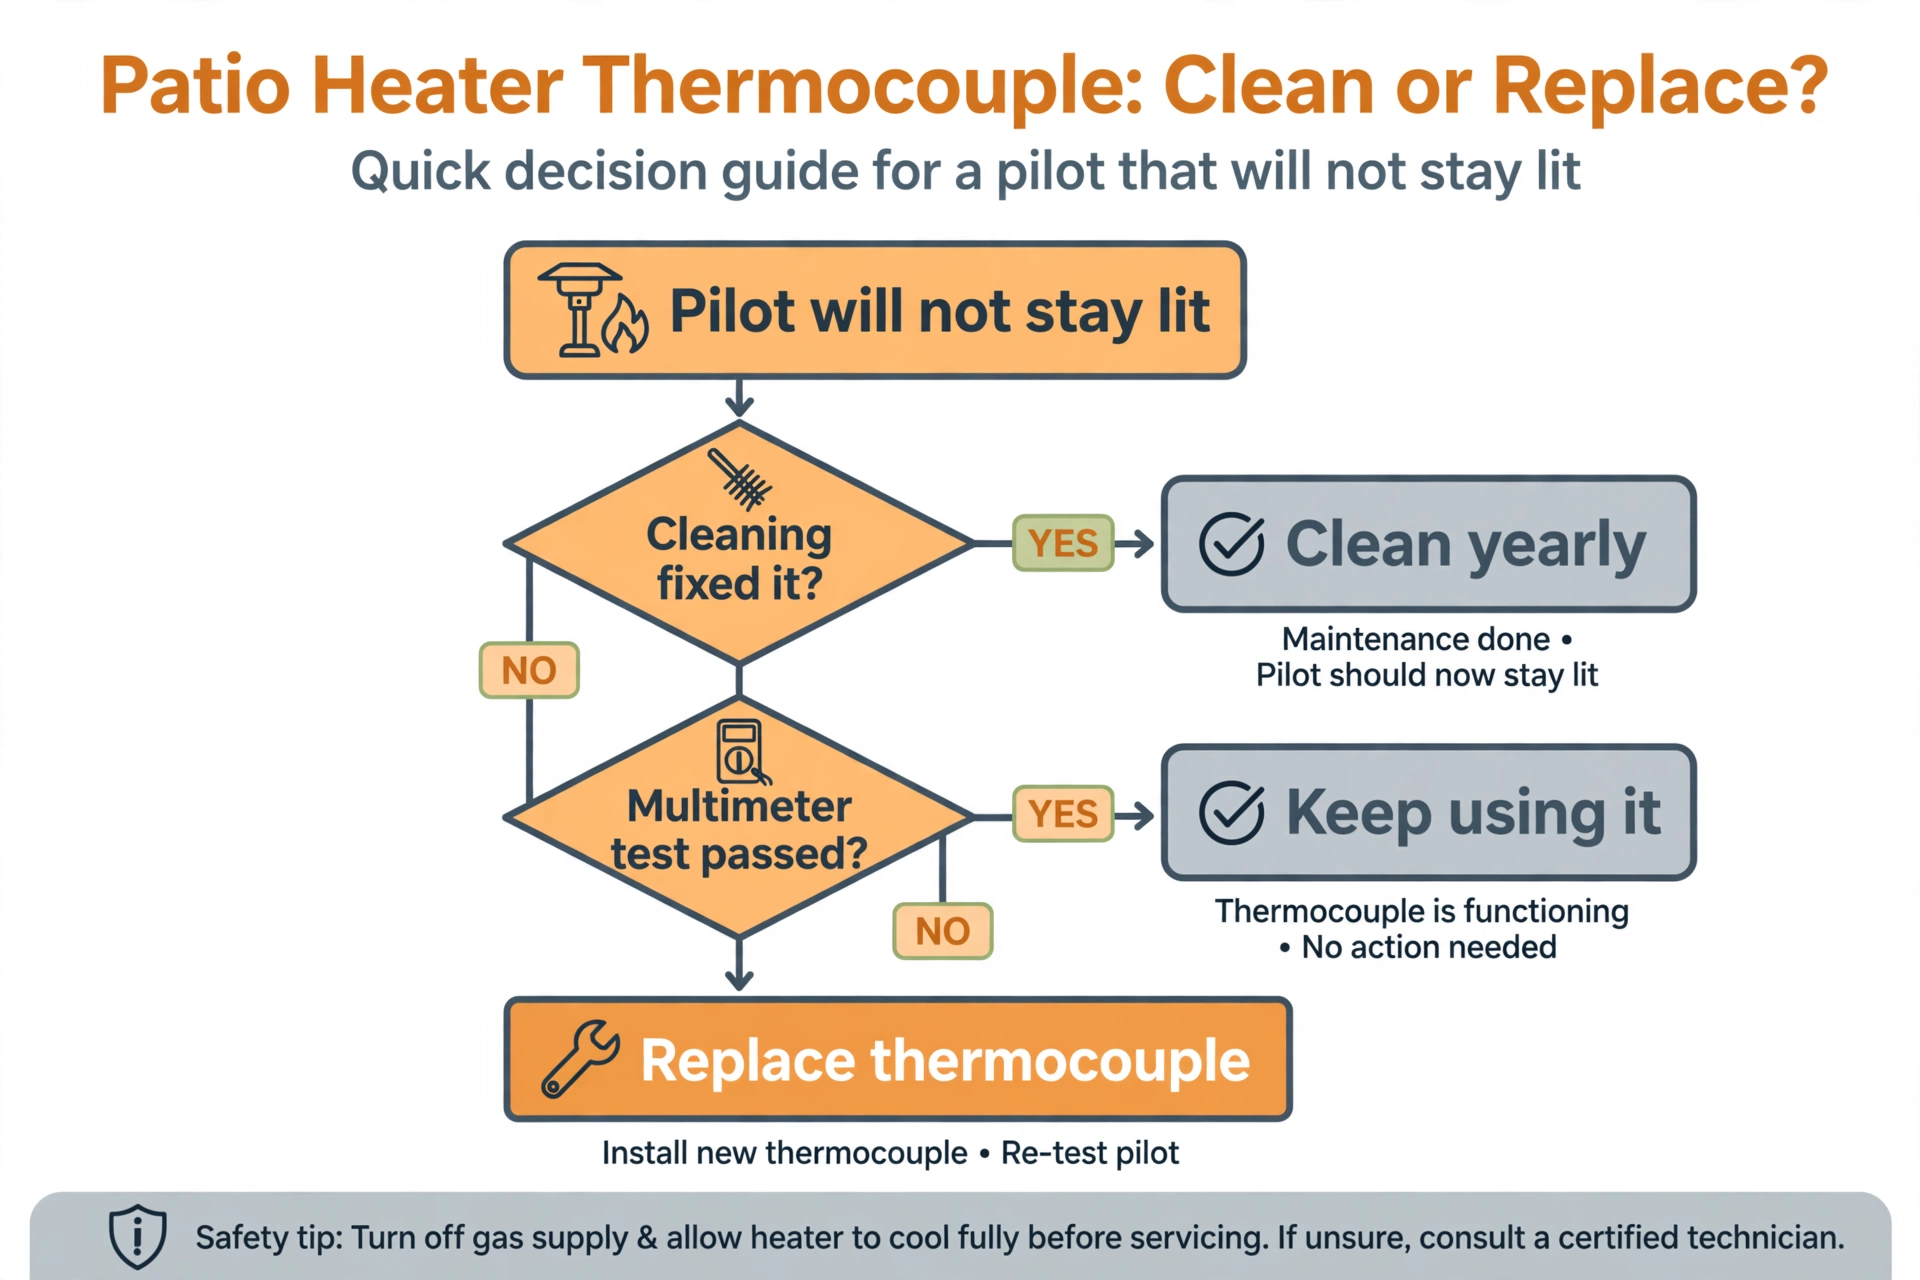
Wipe the tip with a dry cloth to remove the dust. Now check the flame’s aim: the pilot flame should wrap around the top half-inch of the probe. If it misses, bend the probe gently until the flame touches it. Relight the pilot, hold the knob for 60 seconds, and release. If the flame stays lit, you are done — no new part needed.
Test the Thermocouple With a Multimeter
Cleaning did not fix it? Time to find out whether the part itself is dead. You will need a digital multimeter with a millivolt (mV) setting. Borrow one if you do not own one — the test takes two minutes.
Disconnect the thermocouple lead from the gas valve. Touch the multimeter probes to the two ends of the lead, then heat the probe tip in the pilot flame (or a candle flame) for 30–60 seconds. A healthy thermocouple reads roughly 25–30 millivolts or more. A reading near zero means the part is dead and needs replacing.
Clean the tip, position it squarely in the pilot flame, then hold the control knob down for a full 60 seconds before releasing. If the pilot still dies, the thermocouple is almost certainly dead. A multimeter only confirms what the flame already told you.
Swap In the New Thermocouple
Buy a replacement that matches the length of your old one — universal thermocouples fit most patio heaters, and your old one is the perfect measuring stick. Loosen the compression nut where the thermocouple meets the gas valve by turning it counterclockwise, then pull the probe out of its bracket.
Thread the new thermocouple into the valve by hand, then snug it with the wrench — about a quarter turn past finger-tight. Overtightening can damage the valve threads. Slide the probe into the bracket exactly where the old one sat.
Reconnect the tank and brush soapy water over every joint you touched. Bubbles mean a leak — snug the fitting a touch more and test again. Light the pilot, hold the knob for 60 seconds, release, and enjoy your heat.
- Pilot dies the moment you release the knob
- Evenings on the patio cut short
- Wondering whether the whole heater is dead
- Pilot stays lit on the first try
- You know exactly where the part lives
- A 15-minute seasonal cleaning keeps it working
- Working on a warm heater. The emitter stays hot long after the flame dies. Wait until everything is cool to the touch.
- Cranking the valve nut too hard. Finger-tight plus a quarter turn is enough. More can damage the valve threads.
- Pointing the probe away from the flame. The pilot flame must touch the tip. A bent probe looks “dead” even when it is perfectly fine.
- Replacing the part before checking the tank. An empty cylinder or kinked hose causes the same symptoms. Check how long a propane tank lasts on a patio heater and confirm you actually have gas before buying parts.
Patio Heater Thermocouple FAQ
The classic sign: the pilot lights while you hold the control knob down, but goes out the moment you release it. If cleaning the tip and repositioning it in the flame does not fix that, the thermocouple is bad.
Yes — and you should try cleaning first. Soot and light corrosion on the tip are the number one cause of thermocouple trouble, and a 20-second scrub with fine steel wool fixes it most of the time. Replace the part only if cleaning and a multimeter test both fail.
A multimeter gives you a firm answer, but it is not required. Clean the tip, seat it in the pilot flame, and hold the knob down for a full 60 seconds. If the pilot still dies on release, the thermocouple is dead — the multimeter would only confirm it.
Match the length of the old one. Universal thermocouples come in several lengths, and your old probe is the perfect measuring stick — lay it next to the new one before installing. The probe type and connection nut are standard across most patio heaters.
Yes, if you shut the propane off at the tank, let the heater cool fully, and soap-test every joint you reconnect. Call a licensed gas professional if you smell gas, see damaged valves or hoses, or if the heater is still under warranty.
Fine steel wool or 220-grit sandpaper · dry cloth · adjustable wrench · multimeter (optional) · matching replacement thermocouple · soapy water · heater manual
- Shut off gas at the tank and let the heater cool (30 min).
- Open the access panel and find the copper probe in the pilot assembly.
- Scrub the probe tip with steel wool until it shines; wipe clean.
- Test with a multimeter (~25–30 mV when hot) or use the 60-second symptom test.
- If dead, swap in a matching-length thermocouple and soap-test every joint.
Your patio heater’s hardest-working safety part now has a full service behind it. A clean, healthy patio heater thermocouple means a pilot that lights the first time and stays lit all evening.
Do this once a season before the cold sets in and you will rarely think about it again. If gas repairs feel like more than you want to take on, compare your options in our guide to electric vs. propane patio heaters.