How to Assemble and Install a Patio Heater: A Step-by-Step Guide for Beginners
Your new patio heater arrived in a tall box, and now that box is sitting on your patio while you wonder where to start. Learning how to assemble and install a patio heater is less hard than the box makes it look. Most freestanding propane models go together with a wrench, a screwdriver, and about an hour of your time.
By the end of this guide, your heater will stand upright on a flat spot, pass a leak test, and light on the first try. You will also know how to anchor it against wind and what to do when a part does not fit the way the pictures show. Read each step in order, and keep your model’s manual open beside you. Manuals differ in small ways, and your manual wins when it disagrees with a general guide.
One warning up front: patio heaters are outdoor appliances. Never run a propane patio heater indoors, in a garage, or under a low enclosed roof. Burning propane gives off carbon monoxide, a gas you cannot see or smell, and enclosed spaces let it build up to dangerous levels. Keep the heater outside, keep clear space around it, and test every gas connection with soapy water before you light it.
⚠ Safety first — read before you build
Outdoor use only. Never use a propane patio heater indoors or in an enclosed space — carbon monoxide risk. Keep the clearances your manual states from walls, ceilings, umbrellas, and branches. Anchor or weight the base so wind cannot tip the heater. Test all gas connections with soapy water — never with a flame. If you smell gas, turn the valve off if you can do so safely, move away, and call your gas supplier or a licensed professional. Natural-gas line hookup must be done by a licensed professional — this guide gives no gas-line installation steps.
This guide is general information, not a substitute for your heater’s manual or local codes. When in doubt, call a licensed professional.
TOTAL TIME
60–90 minutes
ACTIVE TIME
60–90 minutes
DIFFICULTY
Beginner-friendly
What You Need
- Freestanding propane patio heater kit (all parts and hardware in the box)
- Your heater’s instruction manual
- Standard 20-pound propane tank, filled (sold separately for most models)
- Adjustable wrench
- Phillips screwdriver
- Spray bottle with water and a squirt of dish soap
- Work gloves
- Tape measure
- A second person to help with the tall steps
- Anchor kit, sand, or water weights if your model includes or recommends them
No socket set on hand? An adjustable wrench covers most bolts on these kits. A small step stool helps when you reach the reflector, but keep your balance in mind and let your helper steady the heater.
At a Glance: The 11 Steps
- Unbox and sort every part
- Read the manual before you build
- Pick a flat, open spot outdoors
- Bolt the base together
- Attach the pole sections
- Mount the burner head
- Fit the reflector hood
- Connect the propane tank
- Test each connection with soapy water
- Light the heater and watch the flame
- Anchor the heater against wind

Step 1: Unbox and Sort Every Part
Cut the box open on a flat surface and lay the parts out in groups: base pieces together, pole sections together, and small hardware in one pile. Count the bolts, washers, and nuts against the parts list in the manual. Finding a missing bolt now saves a half-built heater and a trip back to the store later.
Keep the packaging until the heater works. If a part is damaged or missing, the box labels and model number speed up a warranty claim. Set glass tubes, reflectors, and other fragile pieces aside where no one will step on them.
Step 2: Read the Manual Before You Build
Skim the whole manual once before you pick up a wrench. Look for the assembly diagram, the clearance distances, and the lighting instructions for your model. Most manuals flag one or two steps where order matters, such as threading a hose through the pole before the pole goes on.
Note the clearance numbers your manual states and the tank size it takes. Write them on a scrap of paper and keep it with your tools. Your manual overrides any general guide, including this one, when the two disagree.
Step 3: Pick a Flat, Open Spot Outdoors
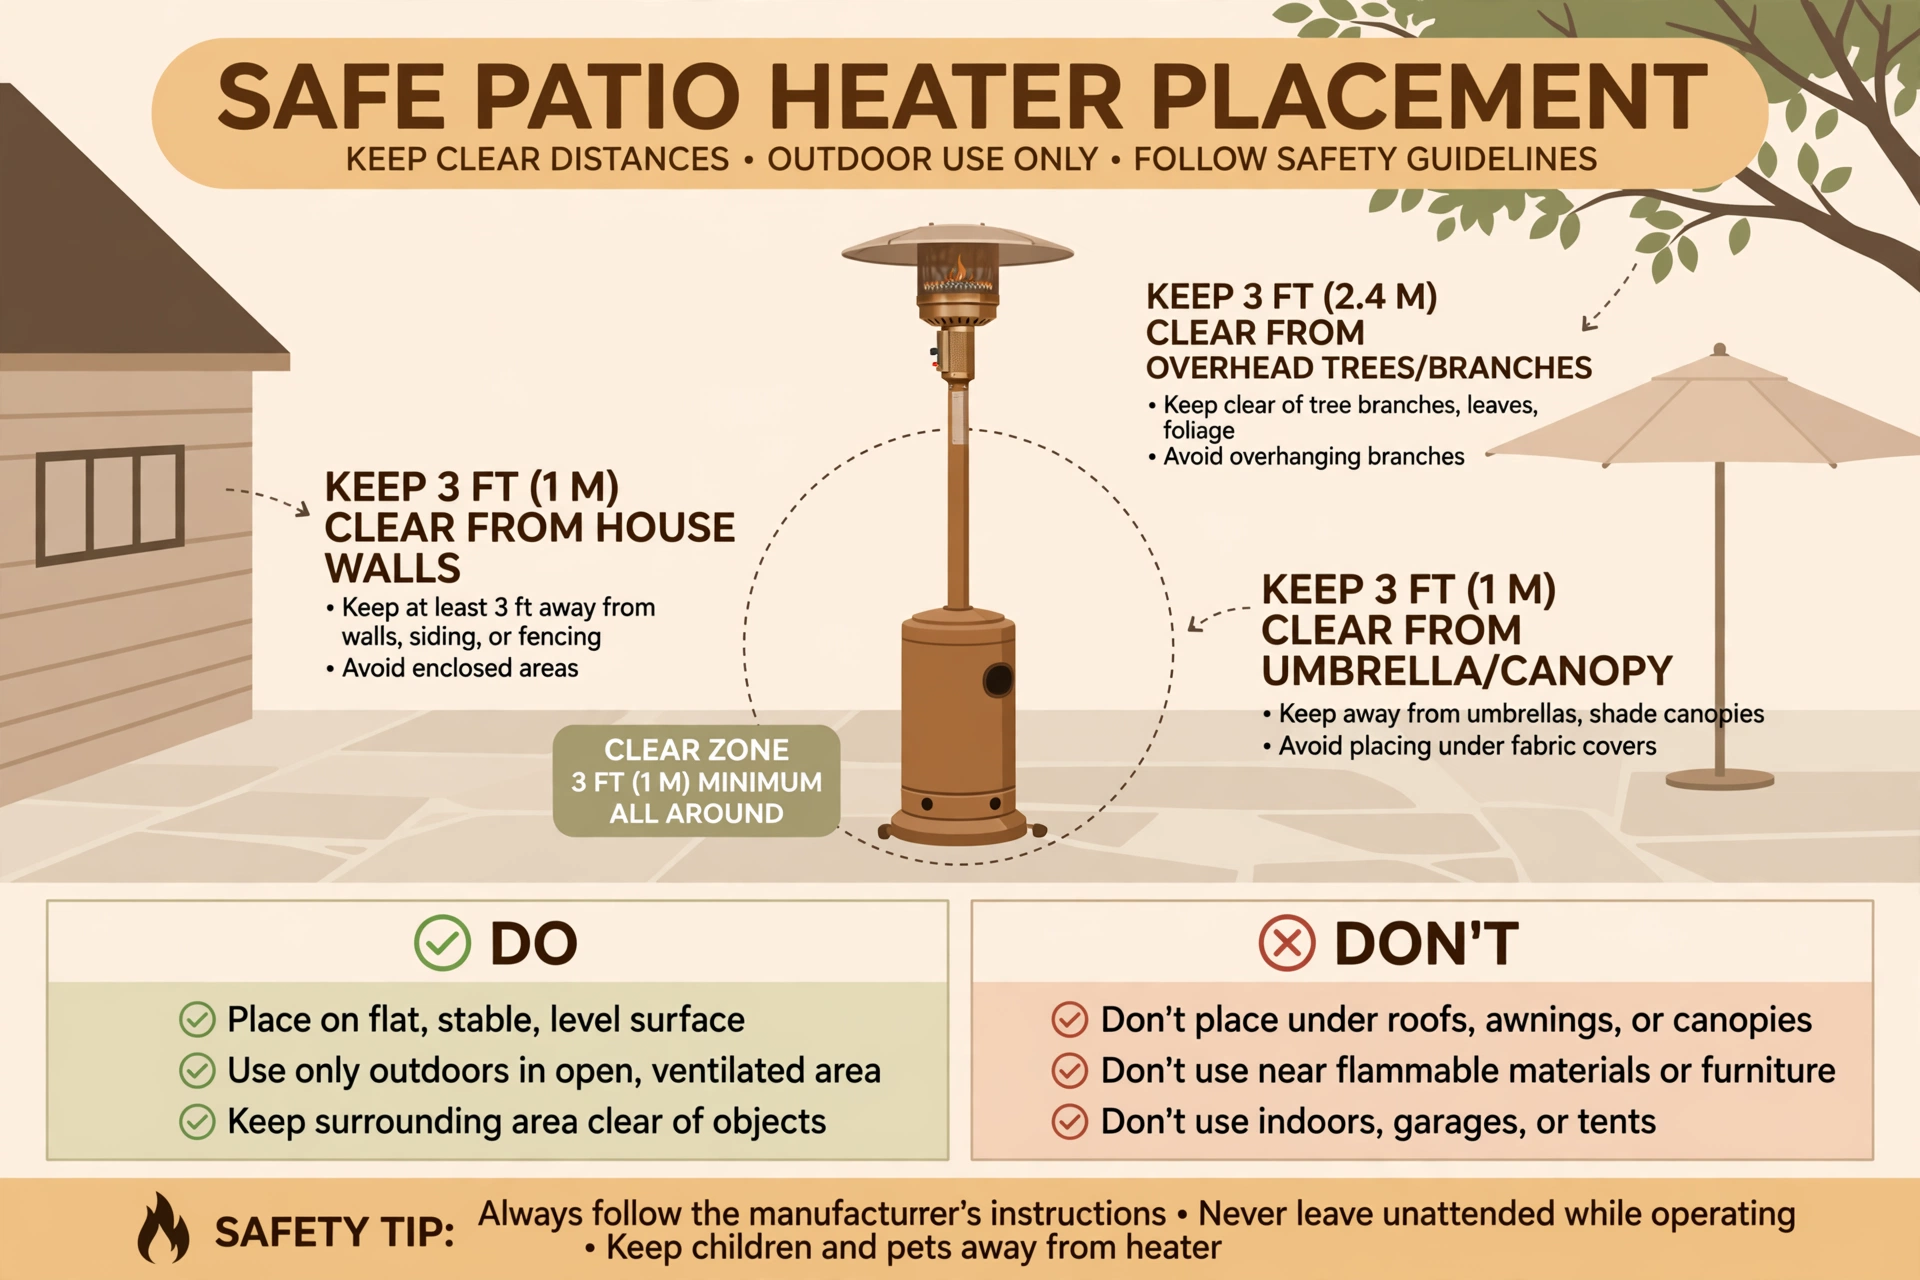
Choose level ground with open air above and around the heater. Patios, decks rated for the weight, and flat lawn areas all work, but the ground must be firm and level so the heater cannot lean. Measure the clearances your manual states from walls, fences, overhangs, umbrellas, and tree branches before you build there.
Think about wind, too. A corner that funnels wind will rock a tall heater and blow heat away from your seats. A sheltered spot near your seating area, with the clearances kept, gives steadier heat. See our guide to patio heater clearance distances.
Step 4: Bolt the Base Together
Start at the bottom. Join the base sections or feet with the bolts the manual shows, and tighten each one until it is snug, then give it a quarter turn more. Over-tightening can crack powder-coated metal or strip the threads, so stop when the joint feels firm and does not shift.
Fit the wheels or casters now if your model has them, and check that they roll and lock. Set the base down and press opposite edges. A base that rocks on flat ground has a loose joint or a bent piece — fix it before you add height.
Step 5: Attach the Pole Sections
Slide the lower pole into the base socket and line up the bolt holes. Some kits hide the gas hose inside the pole, so thread the hose through the pole before you join the sections, as the manual shows. A hose pinched between pole sections can leak, and you will not see it once the heater is together.
Join the upper pole section, keeping the hose free and unkinked inside. Tighten the pole bolts evenly on both sides so the pole stands straight. Sight up the pole from two directions — a lean now becomes a wobble later.
Step 6: Mount the Burner Head
Lift the burner head assembly onto the top of the pole with your helper steadying the pole. Line up the mounting holes and fit the bolts loosely at first, then tighten them in turn. Loose-first fitting lets the head settle square instead of binding at an angle.
Check that the gas hose connects to the burner inlet without sharp bends. A hose bent tight against a metal edge can wear through over a season. Route it with a gentle curve, and keep it away from any part that gets hot during use.
Step 7: Fit the Reflector Hood
Place the reflector hood over the top of the burner head and align its bolt holes or clips. Reflectors ship in sections on some models — join them on the ground first, then lift the full hood as one piece. Hold it steady while your helper fits the fasteners.
Tighten the hood evenly so it sits level. A tilted reflector throws heat to one side and looks wrong from across the patio. Give it a light shake when done. It should feel solid, with no rattling panels or loose edges.
Step 8: Connect the Propane Tank
Open the tank compartment door and set the filled propane tank upright inside. Connect the regulator hose to the tank valve, turning the coupling clockwise until it stops. Hand-tight is the rule here — a wrench on the tank coupling can damage the seal and cause a leak.
Keep the tank valve closed. You will open it for the leak test next. If your model takes a different size than the standard 20-pound tank, check the manual before you buy. For help judging how far a tank goes, read how long a propane tank lasts on a patio heater.
Pro tip: Smear a drop of dish soap on the tank coupling threads if the coupling feels stiff. It threads on smoothly, and the soap rinses away later.
Step 9: Test Each Connection With Soapy Water
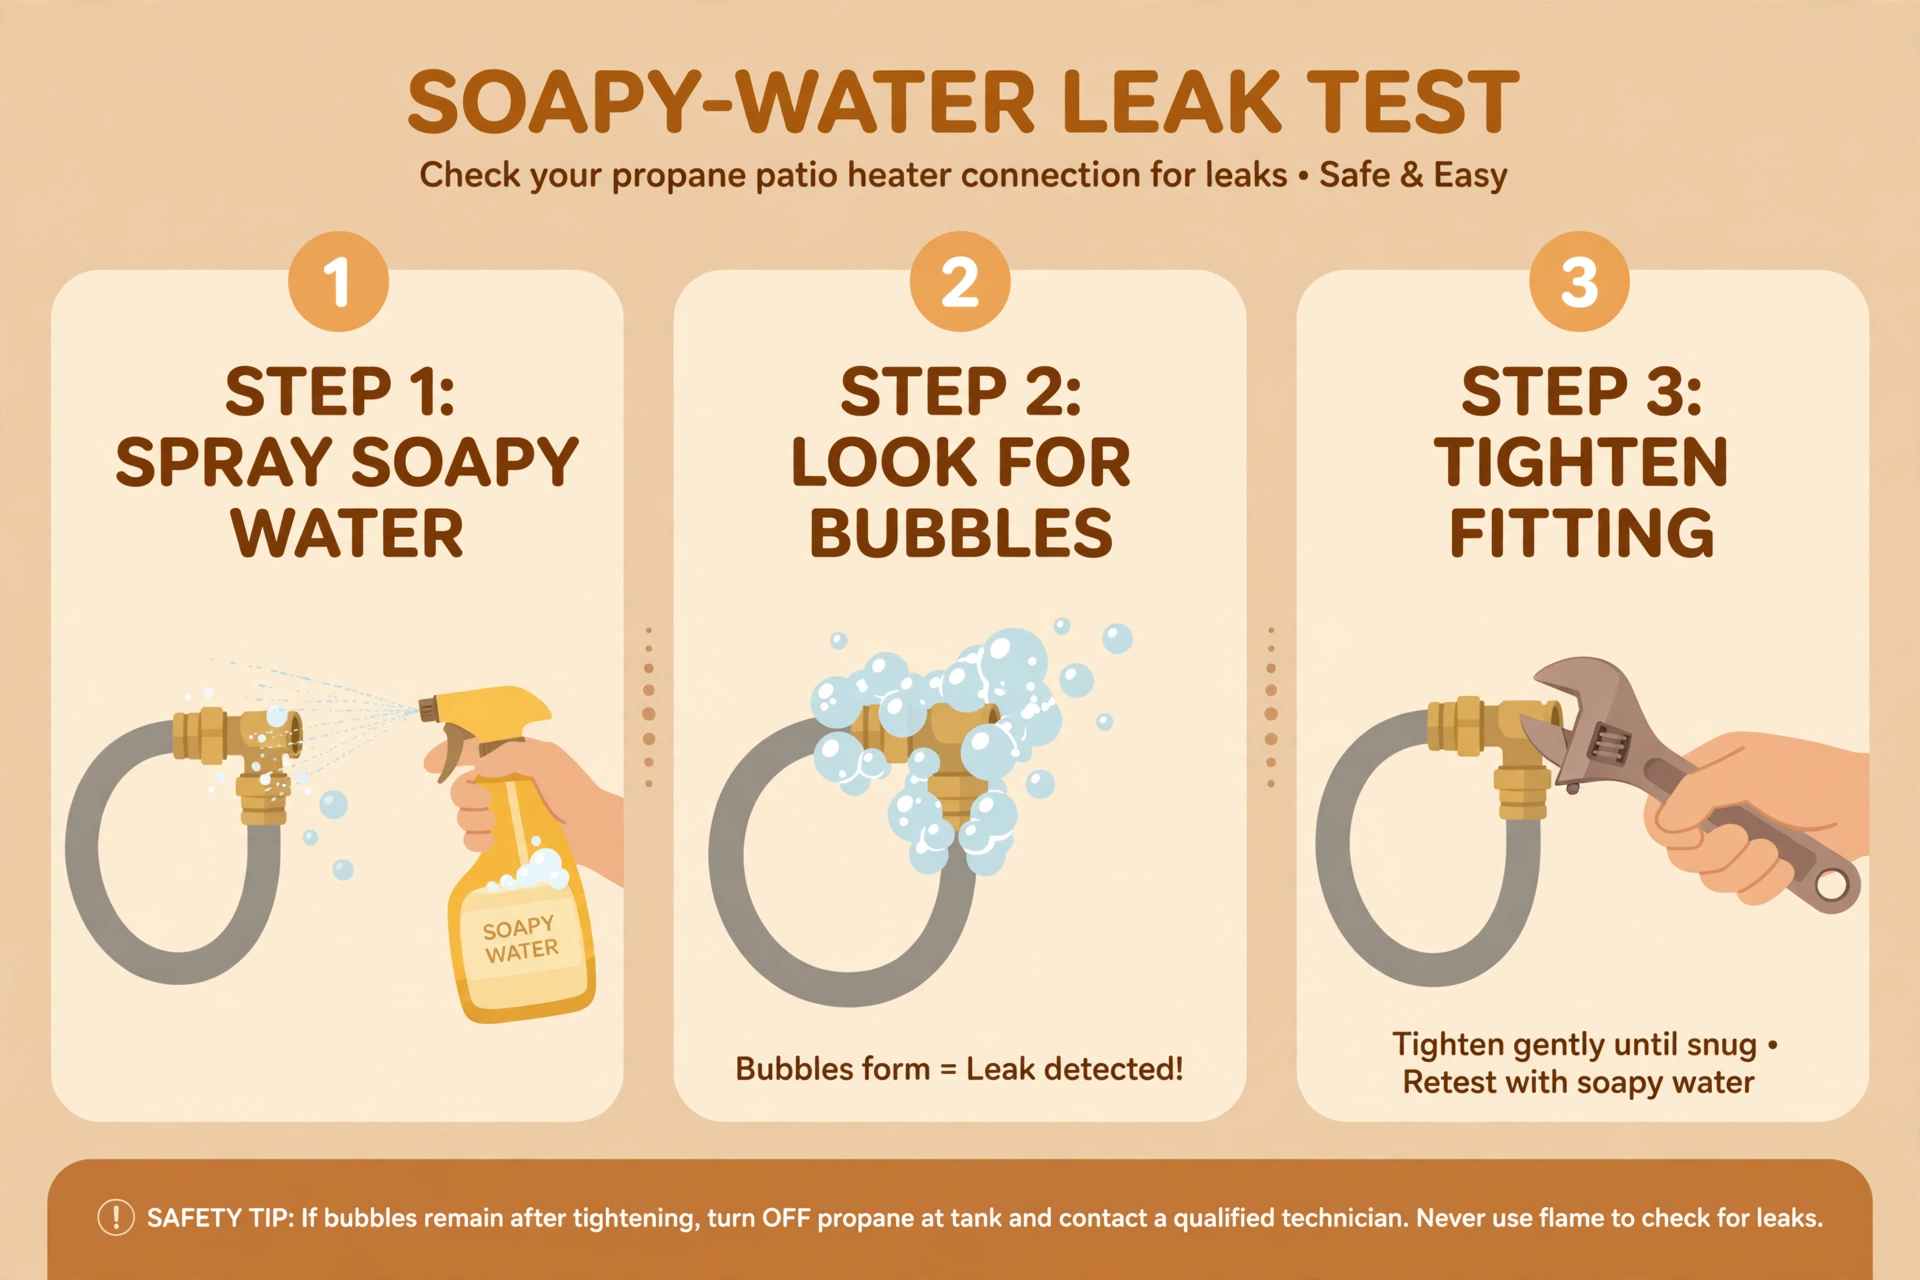
Open the tank valve slowly, then spray or brush soapy water over every connection: the tank coupling, the hose fittings, and the burner inlet. Watch each joint for at least 30 seconds. Growing or reforming bubbles mean gas is escaping.
If you see bubbles, close the tank valve, undo that joint, check the seal and threads for dirt, reconnect it, and test again. A joint that still bubbles after two tries needs a new seal, hose, or regulator — or a call to a professional. Never skip this test, and never test for leaks with a flame.
Heads up: If you smell gas at any point, do not light the heater and do not flip electrical switches nearby. Close the tank valve if you can reach it safely, move away from the heater, and call your gas supplier or a licensed professional.
Step 10: Light the Heater and Watch the Flame
Follow your manual’s lighting steps — most models ask you to hold the control knob while pressing the igniter, then hold it 30 seconds more to warm the thermocouple. Watch the burner through the viewing slot. A steady blue flame with small yellow tips is normal.
Run the heater 5 minutes and check the flame stays lit when you release the knob. If the flame dies on release, the thermocouple may need cleaning or replacement — see our guide to cleaning, testing, and replacing a patio heater thermocouple. For daily lighting habits, read how to use a patio heater.
Step 11: Anchor the Heater Against Wind
Turn the heater off and let it cool before you anchor it. Fill the base weights with sand or water if your model uses them, or bolt the anchor kit to the patio as the manual shows. A tall heater catches wind like a sail, and a full tank adds weight low down, which helps.
Test the anchor by pushing the pole gently from two sides. The heater should rock slightly and settle back, not slide or lift. Cover the heater when it is not in use, and always turn the tank valve off after each evening.
How to Assemble and Install a Patio Heater: Tabletop, Electric, and Natural Gas Notes
Tabletop models follow the same order — base, pole or stem, burner, reflector — but they sit on a sturdy table instead of the ground. Check the table’s weight rating first, since a tabletop heater plus a small tank is heavier than it looks. Keep the same clearances and the same soapy-water leak test.
Electric patio heaters skip the tank and leak test entirely. Mount or hang them per the manual, plug them into a grounded outdoor outlet rated for the heater, and keep the cord where no one trips on it. Never run an electric heater’s cord under a rug or through standing water.
Natural gas models are the exception to do-it-yourself. A natural gas patio heater connects to a fixed gas line, and that hookup must be done by a licensed professional, who will also check local codes and permits. You can still assemble the heater body yourself, but leave every gas-line step to the pro. If you are still choosing between fuel types, compare electric vs propane patio heaters before you buy.
Troubleshooting
| If This Happens | Try This |
|---|---|
| Heater wobbles | Check the base bolts and pole joints for looseness; move the heater to flatter ground. |
| Burner will not light | Confirm the tank valve is open and the tank is not empty; hold the knob longer so the thermocouple warms up. |
| Flame dies when you release the knob | Clean or test the thermocouple; replace it if cleaning does not help. |
| Bubbles in the leak test | Close the valve, reconnect the joint, retest; replace the seal or hose if bubbles persist. |
| Gas smell | Do not light the heater. Close the valve if safe, move away, and call your gas supplier or a licensed professional. |
| Weak or uneven heat | Check the reflector is level and the burner ports are clean and clear of debris. |
Frequently Asked Questions
How long does it take to assemble a patio heater?
Most freestanding propane models take 60 to 90 minutes with two people, including the leak test. Your first build lands at the long end of that range.
What tools do I need to assemble a patio heater?
An adjustable wrench and a Phillips screwdriver cover most kits, and some kits include their own wrench. Check your manual’s tool list before you start.
Can I install a patio heater under a covered patio?
Only if your manual allows it and the stated clearances to the ceiling and walls are met. Never use one in an enclosed space, and never under a low roof that traps heat and exhaust.
Can I use a patio heater indoors?
No. Propane patio heaters are outdoor-only because burning propane produces carbon monoxide, which can build up to dangerous levels indoors.
What should I do if the soapy water test shows bubbles?
Close the tank valve, reconnect the joint, and test again. If bubbles persist after two tries, replace the seal, hose, or regulator, or call a licensed professional.
Do I need a professional to install a natural gas patio heater?
Yes. Any connection to a fixed natural gas line must be done by a licensed professional, who will also confirm local code and permit requirements.
Quick Reference Card
You need: Heater kit, manual, filled 20-pound propane tank, adjustable wrench, Phillips screwdriver, soapy water spray bottle, gloves, tape measure, a helper.
- Unbox and sort parts
- Read the manual
- Pick a flat, open outdoor spot
- Bolt the base together
- Attach the pole sections
- Mount the burner head
- Fit the reflector hood
- Connect the propane tank
- Soapy-water leak test every joint
- Light it and watch the flame
- Anchor it against wind
Remember: Outdoor use only. Soapy water, never flame, for leak tests. Gas smell means stop and call a professional.
That is how to assemble and install a patio heater from box to first flame. You picked a safe spot, built it in order, proved every joint with soapy water, and anchored it for wind. Your next step is a quiet evening test run — light it, sit with it for a while, and get a feel for the heat before guests arrive.
Keep the manual somewhere you can find it. You will want it for the first tank change, the first cleaning, and the day you pack the heater away for the season.