How to Clean an Electric Fireplace: A Beginner’s Step-by-Step Guide
Dust and fingerprints can dull the glow of an electric fireplace fast. A thin film on the glass makes flames look dim, and dust in the vents can block airflow.
A full clean takes about 30 minutes, and you need no special tools. This guide walks you through each part in order, with safety steps first. If you are new to these heaters, learn what an electric fireplace is before you start.
⏱ Time & Difficulty
Time: About 30 minutes for a full clean, 10 minutes for a light wipe-down
Difficulty: Beginner — no tools beyond cloths and a vacuum
How often: Light clean every 2 weeks; deep clean every 3 months
These times are a good routine for most homes. Your manufacturer’s manual always wins if it says something different.
⚠️ Safety First — Read Before You Clean
Unplug the unit and let it cool completely before you clean. Never spray liquids into vents or onto electrical parts. Use only a lightly damp cloth.
Do not open the heater housing or touch wiring. Follow your manufacturer’s manual. Call a licensed professional for internal faults, strange smells, or damage to the cord.
Disclaimer: This guide covers routine surface cleaning only. It does not replace your manufacturer’s manual or advice from a licensed electrician.
🧰 What You Need
- Two soft microfiber cloths (one for washing, one for drying)
- A small bowl of warm water and a drop of mild dish soap
- A vacuum with a brush tool
- A soft brush or old toothbrush for the remote and vent slats
- A dry towel for drips
- Glass cleaner — only if your manual allows it
Skip paper towels, scouring pads, and harsh sprays. They can scratch glass or leave a film on the surface.
At a Glance: The 8 Steps
Here is the full run in short form. Each step below adds the detail you need.
- Unplug the fireplace and let it cool
- Gather your cleaning supplies
- Dust the outside and the vents
- Wipe the glass front
- Clean the ember bed and logs
- Wipe the frame and controls
- Check the remote and power cord
- Plug in and test the flames and heat
Know the Parts You Will Clean
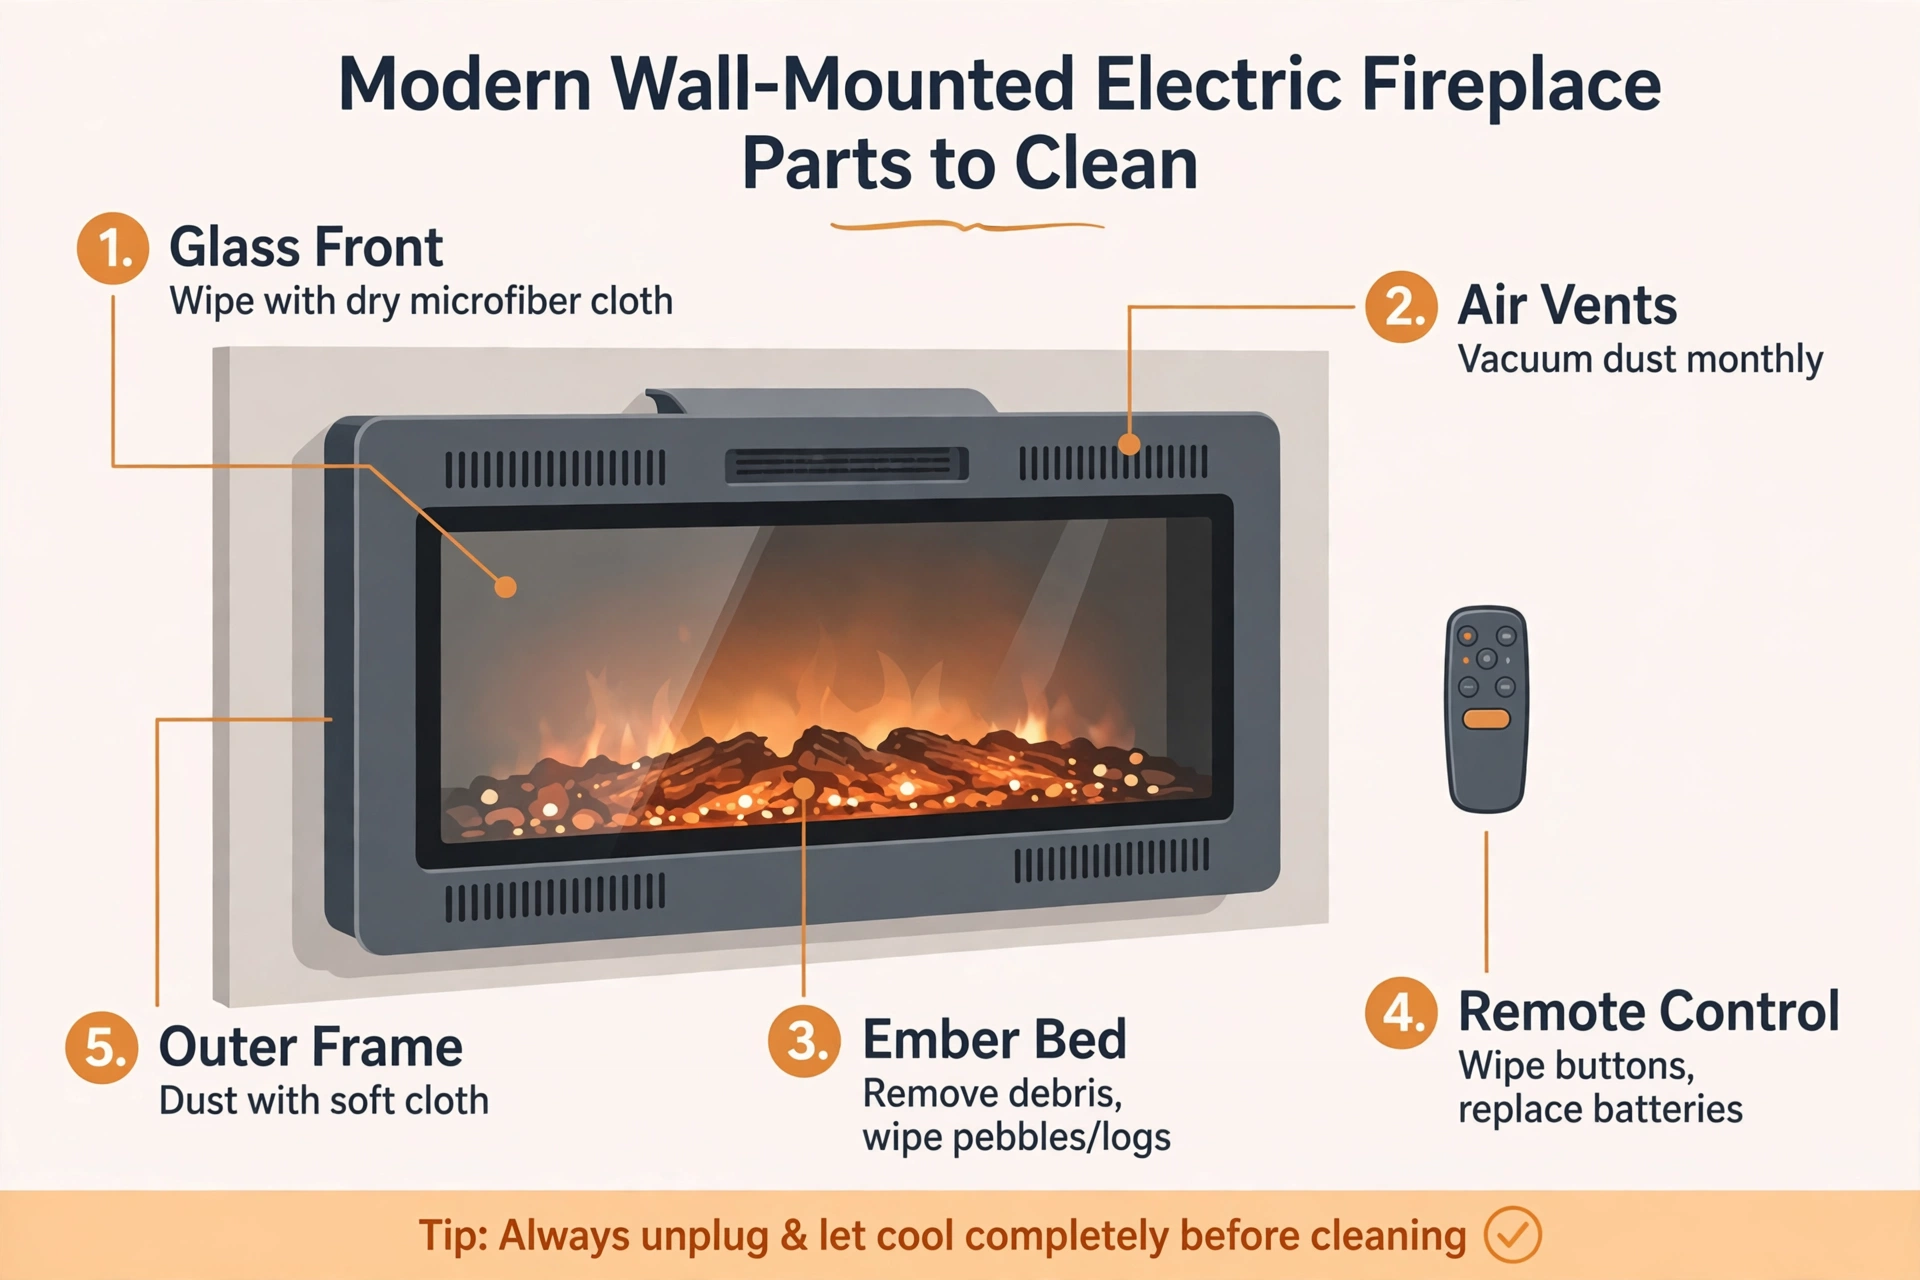
Most electric fireplaces have the same five areas to clean: glass front, air vents, ember bed, outer frame, and remote control. The heater itself stays closed. Learning how an electric fireplace makes its flames helps you see why clean glass and clear vents matter so much for the look and the heat.
Step 1: Unplug the Fireplace and Let It Cool
Grip the plug body and pull it from the wall outlet, not the cord. Heat can linger inside the unit long after the flames go dark, so wait at least 30 minutes before you touch the glass or the vents. A cool unit protects your hands and keeps dust from baking onto warm parts. While you wait, check that pets and small children stay clear of the work area.
Step 2: Gather Your Cleaning Supplies
Set out two soft microfiber cloths, a small bowl of warm water, a mild dish soap, a vacuum with a brush tool, and a dry towel. Keep glass cleaner nearby only if your manual allows it, and read the label before you use it. Lay the cloths on a clean surface near the fireplace so you do not need to hunt for them mid-task. A tidy setup cuts the risk of drips on floors and furniture.
Step 3: Dust the Outside and the Vents
Run a dry microfiber cloth over the top, sides, and front frame to lift loose dust. Use the vacuum brush tool on the air vents with light, slow strokes, and hold the nozzle a short distance from the slats. Dust in vents can block airflow and make the heater work harder, so a gentle pass here pays off. Wipe the floor in front of the unit last, since dust often falls during this step.
Step 4: Wipe the Glass Front
Dampen one cloth with warm water and a drop of mild dish soap, then wring it until it feels barely damp. Wipe the glass in straight lines from top to bottom, and rinse the cloth often so grime does not spread. Dry the glass right away with the second cloth to stop streaks from forming. Skip abrasive pads and harsh sprays, since they can scratch the coating or leave a film that dulls the flames.
💡 Pro Tip: Check the glass in daylight
Streaks hide under warm lamp light. Stand to one side and let daylight fall across the glass. Any missed smudge shows up at once, and you can buff it out while the dry cloth is still in your hand.
Step 5: Clean the Ember Bed and Logs
Open the glass panel only if your manual shows how to do it safely, and lift out loose logs or crystals with care. Wipe each piece with a dry cloth, and pick up crumbs or pet hair from the bed with the vacuum brush tool. Place each piece back in its old spot, since a shifted ember bed can look patchy once the flames return. Close the panel with care and check that it sits flat before you move on.
⚠️ Heads Up: Do not force the glass panel
If the panel does not lift with light pressure, stop. Some models have fixed glass, and force can crack it or break clips. Check your manual for your model, and clean fixed glass from the outside only.
Step 6: Wipe the Frame and Controls
Wipe the outer frame, side panels, and control buttons with a cloth that is barely damp, then dry each spot at once. Pay close care to fingerprints near the buttons, since oils from hands show up fast on dark trim. Keep water far from seams, buttons, and vents, and never let a cloth drip onto the unit. A quick dry pass leaves the frame neat and stops water marks from drying in place.
Step 7: Check the Remote and Power Cord
Wipe the remote with a dry cloth, and clear dust from between the buttons with a soft brush. Open the battery cover, check for leaks or white crust, and swap weak batteries for fresh ones of the same type. Look over the power cord for cuts, kinks, or heat marks, and check that the plug fits snug in the outlet. A frayed cord or a loose plug means stop and call a pro — do not tape it and keep using it.
Step 8: Plug In and Test the Flames and Heat
Push the plug fully into the outlet and switch the unit on with the flame effect first, heat off. Watch the flames for even light and check that the ember bed glows as it did before you cleaned it. Turn the heat on low for a few minutes and listen for odd rattles or smells, then switch it off if anything seems wrong. A short test run proves the clean worked well and catches loose panels before you settle in for the evening.
If the flames do not start after cleaning, check our guide on how to turn on an electric fireplace for the switch and remote steps for your model.
How Often Should You Clean Each Part?
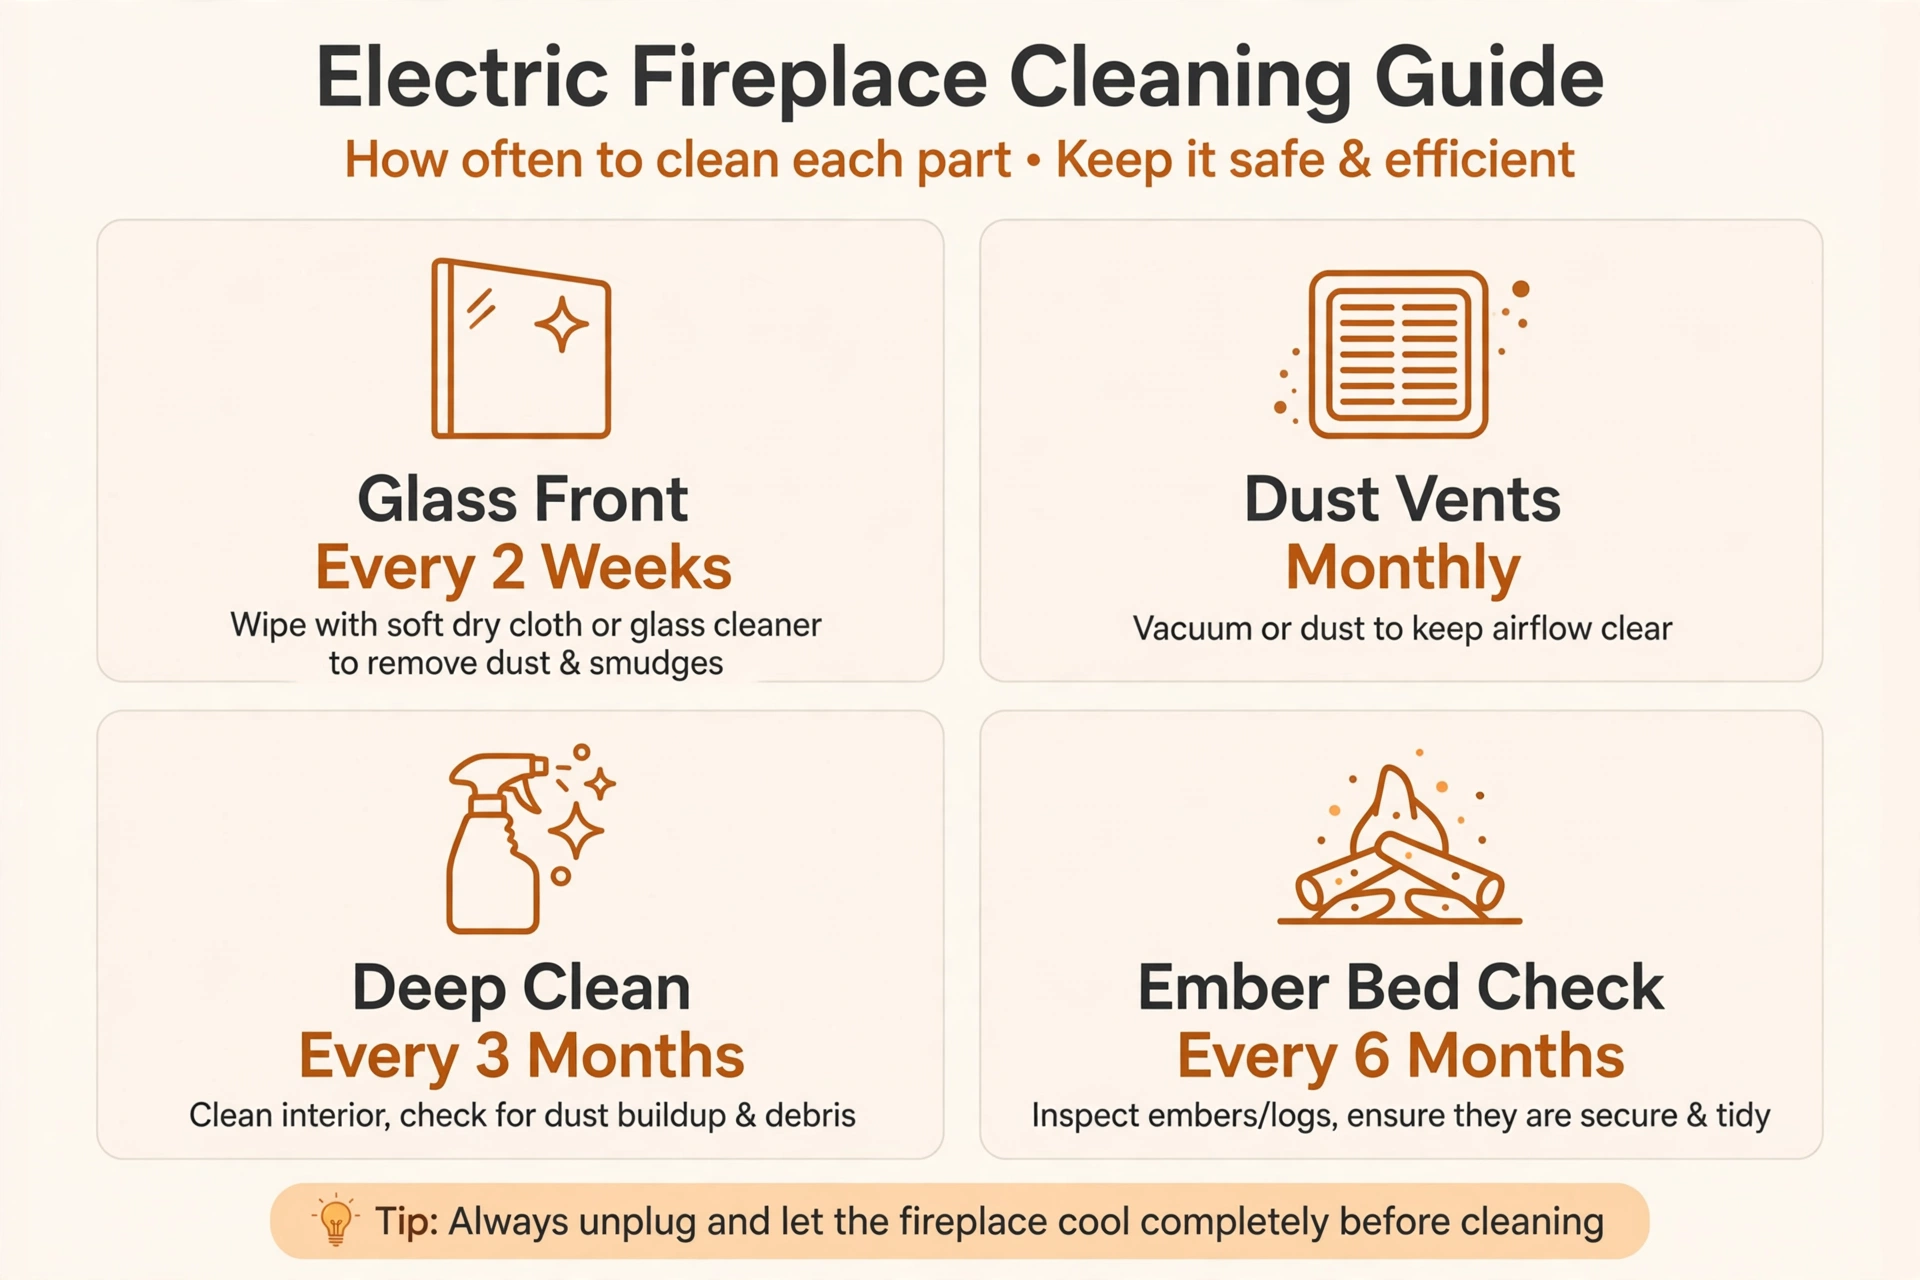
A light wipe every 2 weeks keeps glass clear and vents open. A deep clean every 3 months covers the ember bed, frame, and remote. Check the ember bed every 6 months for shifted pieces or debris.
Homes with pets, open fires nearby, or a lot of dust may need more frequent wiping. Regular cleaning also helps keep running costs in check, since blocked vents force the heater to work harder. If you are weighing the costs, read are electric fireplaces worth it for the full picture on value and running costs.
When to Call a Professional
Stop cleaning and call a licensed professional if you find a damaged cord, a burning smell that stays after cleaning, a breaker that trips each time the heat runs, or a fan that rattles inside the housing. These signs point to faults inside the unit, and the housing must stay closed.
Do not try to fix wiring, heating parts, or fan motors on your own. A pro can test the unit safely and tell you if a repair or a new unit makes more sense.
❌ Common Mistakes to Avoid
- Spraying cleaner into vents. Liquid inside the unit can cause a short. Spray onto a cloth, never into the fireplace.
- Cleaning while the unit is warm or plugged in. Heat bakes dust onto glass, and power adds shock risk. Unplug and wait 30 minutes.
- Using abrasive pads or harsh sprays. These scratch glass coatings and leave films that dull the flames.
- Soaking cloths. A dripping cloth sends water into seams and vents. Wring cloths until barely damp.
- Opening the heater housing. Internal parts are not part of routine cleaning. Leave the housing closed.
Frequently Asked Questions
How often should I clean my electric fireplace?
Wipe the glass and dust the vents every 2 weeks. Give the unit a deep clean every 3 months, and check the ember bed every 6 months. Homes with pets or a lot of dust may need more frequent wiping.
Can I use glass cleaner on an electric fireplace?
Check your manual first. If glass cleaner is allowed, spray it onto a cloth, never onto the glass or into vents. A cloth dampened with warm water and a drop of mild dish soap works well for most models.
Can I spray water into the vents?
No. Never spray water or cleaner into vents or onto electrical parts. Water inside the unit can cause a short or damage the heater. Use a dry cloth or a vacuum brush tool on vents.
Why does my electric fireplace still look dusty after I clean it?
Dust often settles again within days in dry rooms or homes with pets. Wipe the top of the unit too, since dust there falls onto the glass. A quick dry wipe once a week keeps buildup low between deep cleans.
Do I need to clean inside the heater?
No. Leave the heater housing closed. Dust the outside vents only, and call a licensed professional if you suspect a fault inside the unit or if the heater makes odd noises.
Conclusion
Your fireplace should now glow clear and bright. You wiped the glass, cleared the vents, and checked the parts that matter most. A short routine like this keeps the flames looking their best all year.
If your old unit still looks tired after a clean, take a look at the best electric fireplaces for a fresh start.
✅ Quick Reference Card — Cleaning Day Checklist
- ☐ Unplug the unit and wait 30 minutes for it to cool
- ☐ Dust the outside, top, and vents with a dry cloth or vacuum brush
- ☐ Wipe the glass with a barely damp cloth, then dry at once
- ☐ Clean the ember bed and logs, and set each piece back in place
- ☐ Wipe the frame and controls, and dry each spot
- ☐ Check the remote, batteries, and power cord
- ☐ Plug in, test the flames first, then test low heat
- ☐ Never spray liquids into vents or open the heater housing