How to Connect a Propane Tank to a Fire Pit Safely: A Step-by-Step Guide
Learning how to connect a propane tank to a fire pit takes about fifteen minutes once you know the order of the steps. You need a standard 20 lb tank, a regulator hose that fits your fire pit, and a spray bottle of soapy water for the leak test. No tools are required for most portable and tabletop fire pits.
This guide walks you through the full hookup for a portable or tabletop propane fire pit: placing the tank, attaching the regulator, connecting the hose, opening the valve, testing for leaks, and lighting the burner. It covers only a standard 20 lb tank with a regulator hose. Hard-piped natural gas lines, buried propane lines, and damaged regulators are work for a licensed gas professional, and this guide tells you where that line falls.
Safety note: propane is flammable, and leaking gas can pool in low spots because it is heavier than air. Work outdoors only, keep the tank valve closed until every connection is made, and never use a match or lighter to check for a leak. If you smell gas at any point, turn off the tank valve, move away from the area, and call your gas supplier or fire department from outside. When in doubt, call a licensed professional.
What You Need
- Propane fire pit rated for a 20 lb tank (portable or tabletop)
- Standard 20 lb propane tank, filled and within its retest date
- Low-pressure regulator hose made for your fire pit (often included with the pit)
- Spray bottle with water and a squirt of dish soap
- Clean rag for wiping fittings
- Long lighter or long match for lighting the burner
- Your fire pit manual — keep it open while you work
If your fire pit did not come with a regulator hose, buy one that matches your pit’s inlet size. The manual lists the fitting size. A hose that does not match is not a problem you can force — return it and get the right one.
At a Glance: The 7 Steps
- Set the fire pit and tank in place
- Check the tank valve and every fitting
- Attach the regulator to the tank
- Connect the hose to the fire pit
- Open the tank valve slowly
- Test every joint for leaks
- Light the burner and check the flame
Step 1: Set the Fire Pit and Tank in Place
Put the fire pit on flat, level ground at least 10 feet from your house, fence, trees, and anything that can catch fire. Check your fire pit manual for its exact clearance, because some models ask for more. Clear dry leaves and clutter from the area before you bring the tank over.
Set the tank upright on level ground beside the fire pit, close enough that the hose reaches without pulling tight but far enough that the tank sits outside the heat of the burner. Most manuals want the tank at least 2 to 3 feet from the fire pit body. Never lay a propane tank on its side. A tank on its side can feed liquid propane into the regulator, which the regulator is not built to handle.
Step 2: Check the Tank Valve and Every Fitting
Confirm the tank valve is fully closed by turning the handwheel clockwise until it stops. Then check the fire pit control knob is turned to the off position. Gas should not flow anywhere while you are making connections, and this double check takes five seconds.
Look over the tank valve threads, the regulator nut, the hose, and the fire pit inlet. You are looking for cracks, dents, rust, bent threads, and any sign the hose has been chewed or cut. Wipe each fitting with a clean rag so dirt cannot get into the seal. A hose with cracks or a fitting with damaged threads belongs in the trash, not on your fire pit — replace it before you go any further.
Heads Up: Check the date stamped on the tank collar. A 20 lb tank must be retested 12 years after its manufacture date, and most refill stations will refuse an out-of-date tank. If the date has passed, exchange the tank at a refill or exchange station rather than trying to fill it.
Step 3: Attach the Regulator to the Tank
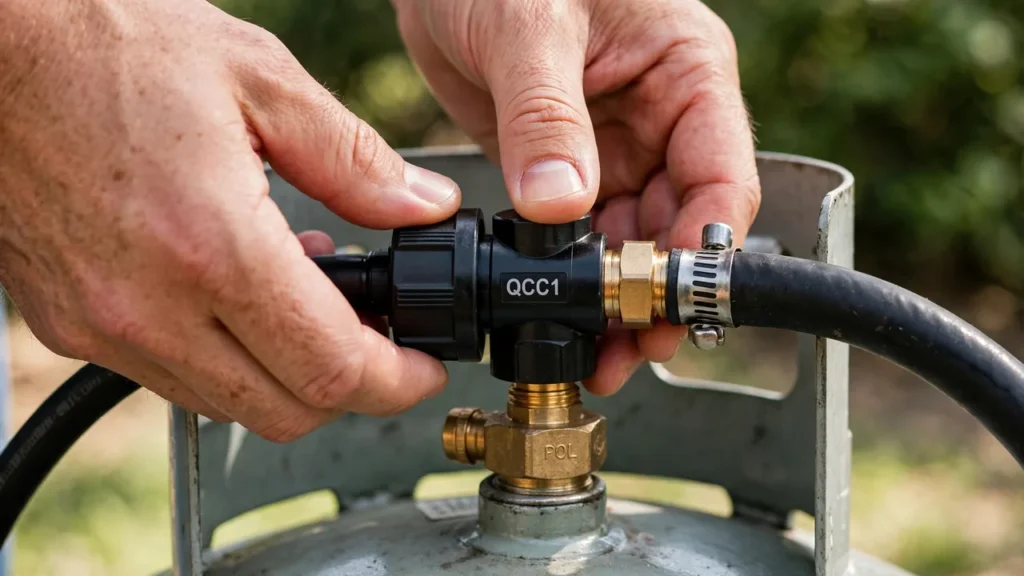
Line up the large black nut on the regulator — the QCC1 or Type 1 connector — with the outside threads of the tank valve. The nut is wider than the valve opening, so it should slide on and seat squarely without force. If it sits crooked, pull it off and start again rather than forcing the threads.
Turn the nut counter-clockwise to tighten it, because QCC1 fittings use a reverse thread. Hand-tighten until it is snug and firm. No wrench is needed here, and a wrench can crush the rubber seal inside the nut and cause the very leak you are trying to avoid. Your fire pit manual is the final word on this step, so follow it if it describes a different fitting.
Step 4: Connect the Hose to the Fire Pit
Take the other end of the hose to the gas inlet on the fire pit. Most portable and tabletop pits use a 3/8-inch female flare fitting that hand-tightens onto the pit’s inlet, and many regulator hoses arrive with this end already attached. Thread it on by hand until it is snug, then give it a firm final twist by hand.
Some larger built-in pits use a key valve with a 1/2-inch or 3/4-inch inlet instead, and those need an adapter or a different hose. If the hose end does not match the inlet, stop and get the matching part. Never wrap plumber’s tape around a flare fitting — flare fittings seal metal to metal, and tape can keep them from seating and cause a leak.
Will Your Hose Fit? A Quick Compatibility Check
| Connection point | What you will see | What fits |
|---|---|---|
| Tank valve | Large outside threads, OPD valve on tanks made since the late 1990s | QCC1 / Type 1 nut, hand-tight, reverse thread |
| Portable or tabletop pit inlet | Small brass male flare fitting | 3/8-inch female flare hose end, hand-tight |
| Built-in pit key valve | Larger threaded inlet, often with a key | 1/2-inch or 3/4-inch adapter — check the manual |
| Regulator | Small round or rectangular device between tank and hose | Low-pressure type, about 11 inches water column |
General guidance for common US fittings. Your fire pit manual lists the exact sizes for your model — use those numbers when buying parts.
Step 5: Open the Tank Valve Slowly
Turn the tank valve handwheel counter-clockwise, very slowly, about one full turn. Opening the valve in a rush can trip the excess-flow safety device inside the tank valve, which cuts the gas flow to a trickle and leaves you with a weak flame or none at all. A slow, steady turn lets gas fill the hose at normal pressure.
Listen as the gas moves into the hose. A faint hiss that stops after a second or two is normal. A hiss that keeps going means gas is escaping somewhere — close the valve right away and go back to Step 2 to recheck every fitting. Do not light the fire pit until the leak test in the next step passes.
Pro Tip: If the flame is weak on your first lighting and you opened the valve fast, close the tank valve, wait a minute, disconnect the regulator, and start again with a slow valve turn. That resets the excess-flow device in most tanks.
Step 6: Test Every Joint for Leaks
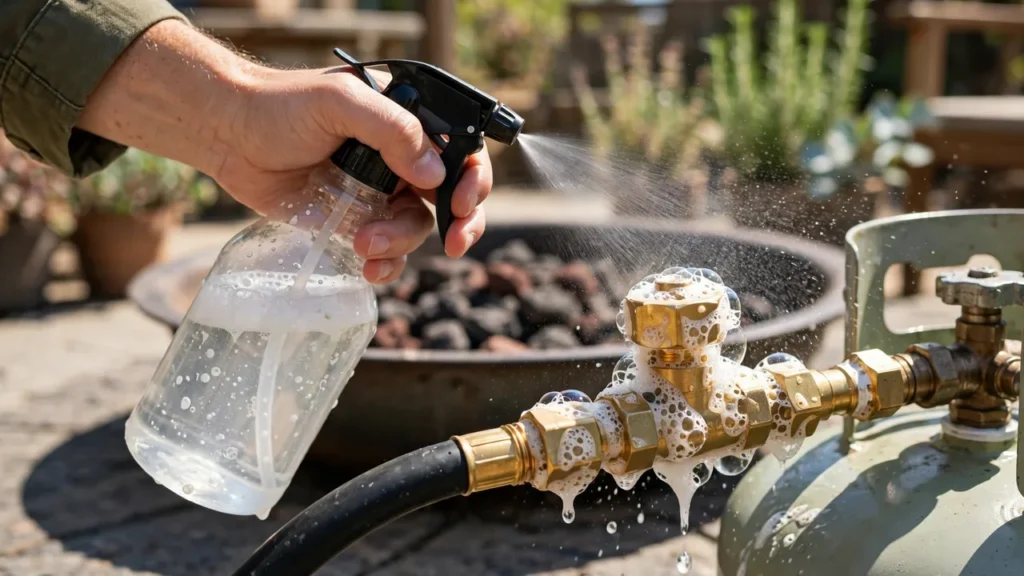
Mix a few drops of dish soap into a spray bottle of water and shake it gently. Spray the solution over the tank valve connection, the regulator joints, and the hose connection at the fire pit until each joint is wet. Watch each spot for at least 30 seconds.
Growing bubbles, or a cluster of bubbles that keeps getting bigger, means gas is escaping at that joint. Close the tank valve, tighten that connection a little more by hand, and test it again. If bubbles keep appearing after a second try, the regulator, hose, or seal is damaged — replace the part and test again. Never light the fire pit while any joint is still bubbling.
Heads Up — If You Smell Gas: Do not light the fire pit. Turn off the tank valve, move away from the area, and call your gas supplier or fire department from outside — never from a phone near the leak. Never try to find or fix a leak with an open flame, and never use a lighter or match to check a joint.
Step 7: Light the Burner and Check the Flame
Hold a long lighter at the edge of the burner, then turn the fire pit control knob to the light or low position. The burner should catch within a few seconds. Keep your face and hands clear of the burner while it lights, and never lean over the pit.
Look at the flame once it is burning. A healthy propane flame is mostly blue at the base with steady yellow tips, and it should spread evenly around the burner. A flame that is weak on one side, sputtering, or mostly yellow can point to a partly blocked burner or a regulator problem — turn the pit off, let it cool, and check the burner holes for debris before lighting it again. Our guide to how to light a gas fire pit covers lighting quirks for different burner styles.
How Long Will One Tank Last?
A full 20 lb tank holds about 4.6 gallons of propane, which carries roughly 421,000 BTU of energy. How long that lasts depends on how high you run the burner. The table below gives honest estimates for common burner sizes, worked out from the standard energy content of propane (about 91,500 BTU per gallon).
Propane Tank Runtime Estimates (2026)
| Tank size | Propane | At 30,000 BTU/hr | At 50,000 BTU/hr | At 65,000 BTU/hr |
|---|---|---|---|---|
| 5 lb | About 1.2 gal | About 3.5 hours | About 2 hours | About 1.5 hours |
| 20 lb (standard) | About 4.6 gal | About 14 hours | About 8.5 hours | About 6.5 hours |
| 30 lb | About 7 gal | About 21 hours | About 13 hours | About 10 hours |
Estimates for 2026. Real runtimes vary with burner setting, wind, and temperature, and a tank is never filled past 80 percent of its capacity. For a deeper look at burn time, see how long a propane tank lasts on a fire pit.
Most portable fire pits run between 30,000 and 65,000 BTU per hour, so a 20 lb tank usually covers several evenings on a medium setting. Running the burner on high the whole night will cut that time sharply. If you are choosing between fuel types for a new pit, our comparison of propane vs. natural gas fire pits lays out the running costs and the hookup differences side by side.
Troubleshooting After You Connect a Propane Tank to a Fire Pit
| If this happens | Try this |
|---|---|
| Bubbles appear at a joint during the leak test | Close the tank valve, tighten the joint by hand, and retest. Still bubbling after two tries? Replace the hose or regulator. |
| Weak flame or no flame after lighting | Close the valve, wait a minute, disconnect the regulator, and reconnect. Open the valve slowly — a fast turn trips the excess-flow device. |
| You smell gas but see no bubbles | Close the valve, move away, and call your gas supplier or fire department from outside. Do not light the pit. |
| Regulator nut will not thread on | Check that the nut is square on the valve and turn it counter-clockwise — QCC1 threads are reversed. Never force it. |
| Hose end does not match the fire pit inlet | Stop and get the matching hose or adapter for your model. Do not tape a flare fitting or force a wrong size. |
| Flame is yellow and sooty | Turn the pit off, let it cool, and clear debris from the burner holes. If the flame stays yellow, have a pro check the regulator. |
Frequently Asked Questions
Do I need tools to connect a propane tank to a fire pit?
No, not for most portable and tabletop fire pits. The QCC1 tank nut and the flare hose fitting both hand-tighten. A wrench can damage the seal inside the regulator nut, so leave it in the toolbox for this job.
Can I use any 20 lb propane tank with my fire pit?
Yes, if the tank has an OPD valve, which every tank sold in the US since the late 1990s does. Check that the tank is within its retest date and that the valve threads are clean and undamaged before you connect it.
How do I know if my propane connection is leaking?
Spray soapy water on every joint after you open the tank valve. Growing bubbles mean gas is escaping. Close the valve, tighten the joint, and test again. Never use a flame to check for a leak.
Can I connect a propane tank to a fire pit indoors?
No. Propane fire pits are outdoor appliances. Propane is heavier than air, so leaked gas pools in low spots, and burning propane indoors creates carbon monoxide. Use the pit outside only, in a well-ventilated area.
Should I leave the propane tank connected when I am done?
Close the tank valve first, then turn off the fire pit control knob. Many owners disconnect the tank between uses and store it upright outdoors, away from the house. Never store a propane tank indoors, in a garage, or in a shed.
When should I call a professional instead of connecting the tank myself?
Call a licensed gas professional for hard-piped natural gas conversions, buried propane lines, a damaged regulator or valve, or any leak you cannot stop. If you are unsure about any fitting, a pro visit costs far less than a gas accident.
Quick Reference Card
You need: 20 lb propane tank, low-pressure regulator hose, spray bottle with soapy water, clean rag, long lighter.
- Place pit and tank on level ground, 10 ft from the house.
- Close the tank valve and the pit control knob; inspect all fittings.
- Hand-tighten the QCC1 regulator nut onto the tank (counter-clockwise).
- Connect the hose to the fire pit inlet by hand.
- Open the tank valve slowly, about one full turn.
- Spray soapy water on every joint; no growing bubbles means no leak.
- Light with a long lighter and check for a steady blue-based flame.
Smell gas? Close the valve, move away, call for help from outside. Never check a leak with a flame.
You have now connected a propane tank to your fire pit the safe way — hand-tight fittings, a slow valve turn, and a leak test before the first flame. The whole hookup takes about fifteen minutes, and most of that is the leak test you should never skip.
Before your next evening by the fire, learn how to put out a fire pit safely so the shutdown is as careful as the setup. If you use a small pit on a patio table, our guide to the tabletop propane fire pit covers placement and clearances for tight spaces. And if you are still deciding what to toss in the flames on a wood-burning night, check what you can burn in a fire pit — never burn treated wood, painted wood, or household trash.