Can You Paint an Electric Fireplace? The Complete Safety and How-To Guide
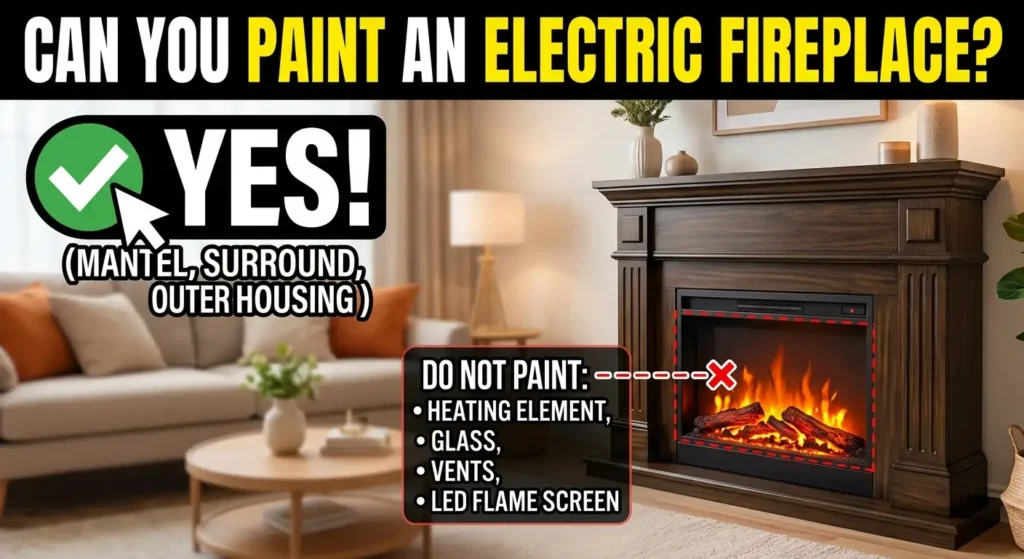
Can You Paint an Electric Fireplace? Quick answer: Yes, it is possible to paint an electric fireplace. The mantel, surround, and outer housing are nearly always safe to paint with the proper preparation and a heat-appropriate paint. The heating element itself, the glass, the vents, or the LED flame screen are what you should never paint because covering them can block airflow or destroy the unit.
When your electric fireplace is still in good condition, but feels old, or has an outdated wood tone or simply no longer suits your new decor, one of the most inexpensive options to make it appear new is to paint it. There is no need to be a professional painter and in the majority of instances, there is no need to purchase a new fireplace at all.
This tutorial shows just what to paint, what type of paint to purchase, and the entire process step-by-step the commonest mistakes that keep people stuck.
Key Takeaways
- Only the housing, mantel, and surround can be painted – never the internal heating components.
- The outward surfaces of electric fireplaces cool far below gas or wood-burning fireplaces, thus most surfaces do not require specialty industrial paint.
- Light sanding and Cleaning are more important to a good finish than the kind of paint you use.
- Two thin coats nearly always out-strike one thick coat.
- The materials needed to paint a complete mantel and surround cost 20-80 and a weekend to complete.
Understanding What an Electric Fireplace Is Made Of
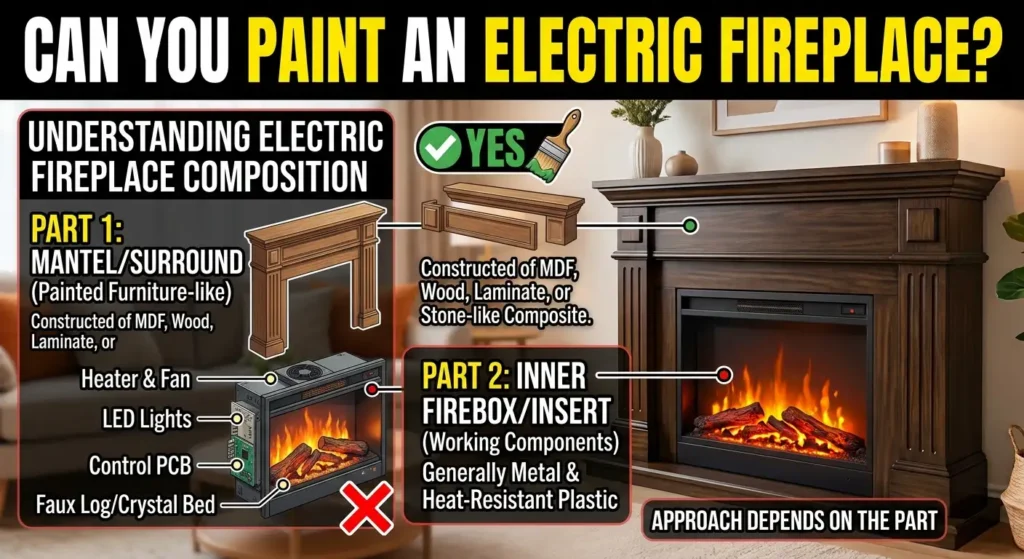
Prior to grabbing a brush, it is a good idea to familiarize yourself with what you are actually dealing with, since electric fireplace typically implies two very dissimilar substances in a single unit.
The mantel or surround is the frame of the fireplace that resembles furniture. This is typically constructed out of MDF (medium-density fiberboard), solid wood, laminate or occasionally stone-like composite. This section acts as any other painted furniture.
The working unit within is the insert or firebox, which contains the heater and the fan, the LED lights, and in some cases a faux log or crystal display behind a sheet of glass. This is generally metal or heat-resistant plastic and is not intended to be repainted like furniture.
It is all about the approach to the project and knowing which part you are looking at makes the difference and this is precisely why the next section is so crucial.
Is It Actually Safe to Paint an Electric Fireplace?
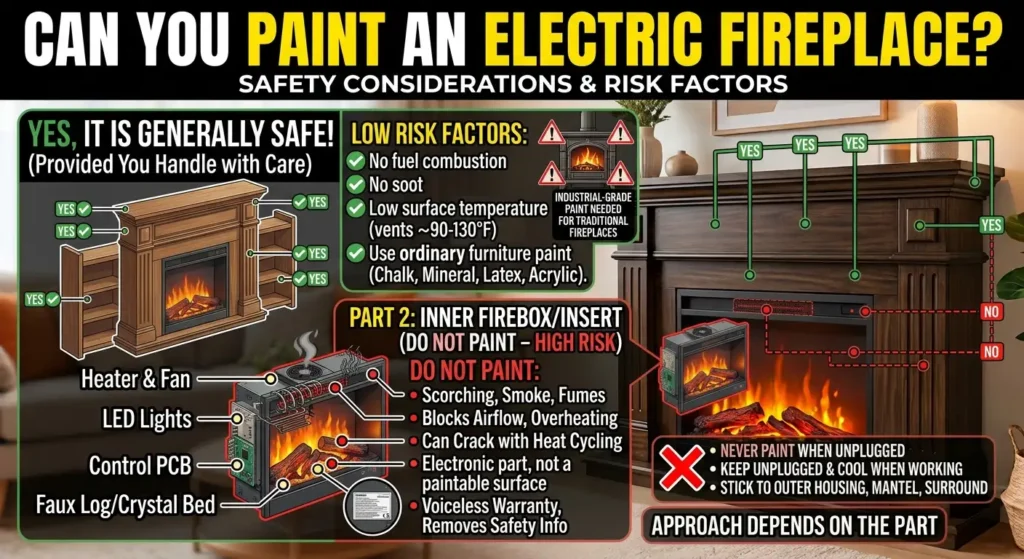
Yes, but there is one great difference. Electric fireplaces do not burn fuel; hence they do not emit the same amount of surface heat, soot and open flame as the wood and gas fireplaces do. The majority of electric inserts heat the air around itself to an approximate of 90 to 130 F at the vents, which is hot but nowhere near that of a traditional firebox.
The implication of this is that the housing and mantel and trim surrounding an electric fireplace do not typically require the same industrial grade, fire-rated paints that a wood-burning fireplace surround would. Ordinary furniture paint, paint which looks like chalk, mineral paint, or a good quality latex or acrylic paint will generally sustain well upon the mantel and surround.
There is, however, no thing like safe to paint. Paint or primer should never be applied on a few parts:
- The coils and heating element- scorches, smokes or fumes off when heated.
- The vents and grilles –These blocks are to be painted over and hence block airflow and may lead to excessive heating of the unit.
- The glass front – glass is not normally intended to support repeated heat cycling of the paint, and painted glass can crack.
- LED screen or flame projector – This is not a paintable surface; it is an electronic part.
- Any manufacturer warning labels or safety certifications- these may cover up your warranty and take away valuable information on safety.
Painting an electric fireplace is very low risk provided you keep the heater unplugged and cool when working, and stick to the outer housing, mantel, shelf and surround.
Can You Paint the Inside of an Electric Fireplace?
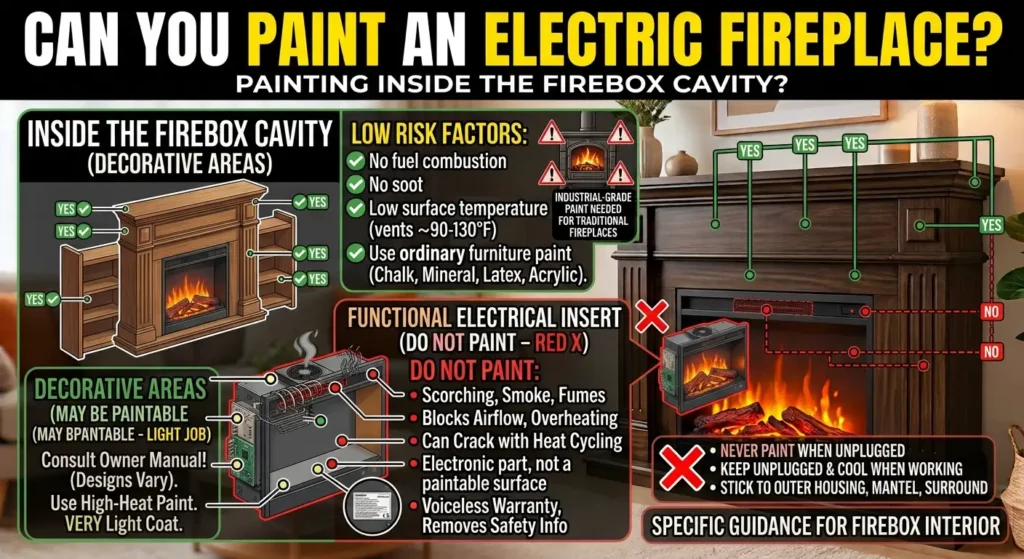
By inner back panel or side walls of the firebox cavity, which are entirely decorative (not heater), a very light job of high-heat paint may be used with some of them – though consult your owner-manual first, designs differ greatly by brand. When you refer to the coil of heating, fan housing, circuit board or LED flame mechanism, the answer is no. They are not ornamental surfaces but functional electrical components, and their painting may disrupt air circulation, insulation, or the dissipation of heat. Always assume that anything behind the glass is out of bounds and center your project on the mantel, surround and outer housing instead.
Painting Different Fireplace Materials
Not all electric fireplace surrounds are created out of the same material, and even the ones that are created out of the same material have a few minor differences in their prep requirements.
Of all the usual materials solid wood surrounds hold the paint best. It only takes a light sand, a layer of primer when you want to go dark to light and two layers of paint.
MDF (medium-density fiberboard) mantels are typical in low and medium-end models. MDF is porous at cut edges, thus seal any open edges with primer to prevent uneven intake of paint and subsequent swelling.
Surrounds made of laminate or veneers are smooth and porous-free, and normal paint will find it difficult to stick to. Here a special bonding primer designed to be used with laminate or melamine is a necessity – failure to use it is the leading cause of peeling laminate fireplace paint job within a few months.
Faux-stone or stone look composite panels can typically be painted, although the texture will read through the paint, creating an appearance of a whitewashed stone to some homeowners and not others. Test a small hidden part to start with.
Thin black metal frames around the opening in the firebox (metal trim and accents) ought to receive a metal-specific primer, and preferably a heat-rated paint, as the trim is nearest to the heat source.
Choosing the Right Paint for an Electric Fireplace
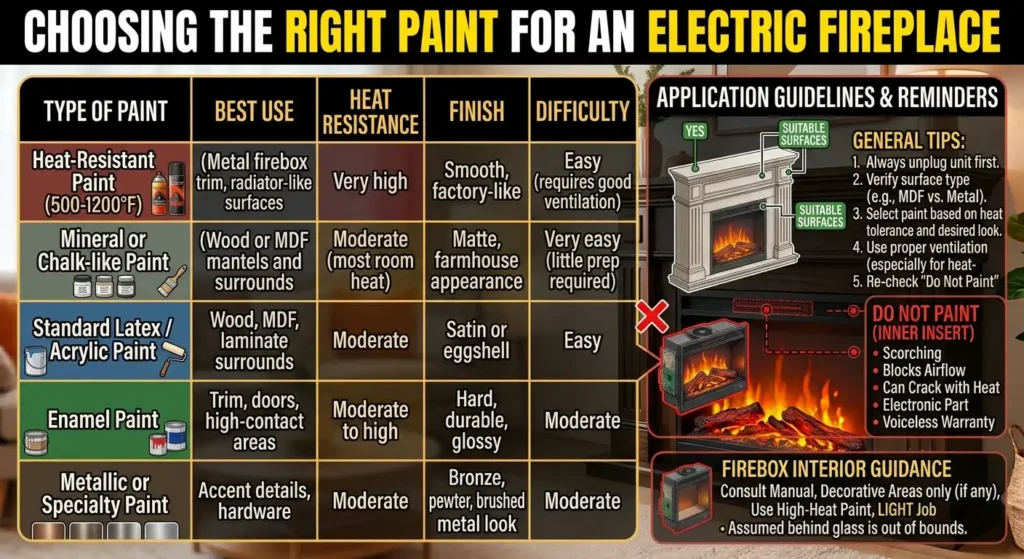
Not all paint will behave in the same manner on all surfaces. The following is a comparison of the most popular options.
| Type of Paint | Best Use | Heat Resistance | Finish | Difficulty |
| Heat-Resistant Paint (500–1200°F) | Metal firebox trim, radiator-like surfaces | Very high | Smooth, factory-like | Easy (requires good ventilation) |
| Mineral or Chalk-like Paint | Wood or MDF mantels and surrounds | Moderate (most room heat) | Matte, farmhouse appearance | Very easy (little prep required) |
| Standard Latex / Acrylic Paint | Wood, MDF, laminate surrounds | Moderate | Satin or eggshell | Easy |
| Enamel Paint | Trim, doors, high-contact areas | Moderate to high | Hard, durable, glossy | Moderate |
| Metallic or Specialty Paint | Accent details, hardware | Moderate | Bronze, pewter, brushed metal look | Moderate |
Rule of thumb: When you are painting metal trim, which is mounted very near the heater vents, select a high heat-rated paint. When you are painting the wood or MDF mantel and surround (which is the overwhelming majority), however, a good-quality furniture or mineral paint suffices.
Popular Color Choices
- Matte black – The most ordered finish; it makes a fireplace appear contemporary and purposeful, not like an appliance.
- Warm white or cream colored- Blends in with farmhouse and coastal-style rooms.
- Deep green or navy blue – A common jewel-tone accent used to make a bolder statement mantel.
- Brushed bronze or pewter – Looks like a metal fireplace surround without the price.
Faux Finishes and Creative Techniques
In case the plain, one-color look is too simple, a few tricks can allow you to go further without requiring a lot of additional expertise:
- whitewash or limewash effect: A paint wash applied dilute allows some of the wood grain or texture to show through to create a more refined, rustic effect – particularly attractive on composite surrounds that imitate stone.
- Two-tone mantels: Choose one color of paint to be used on the main surround, then choose a contrasting accent paint to use as trim, molding or shelf edges, like black trim on white mantel.
- Metallic accents: A tiny metallic paint pen or brush-on metallic finish on a piece of hardware, trim, or a decorative mantel shelf edge will provide contrast without repainting the entire object.
- Faux stone or brick Specialty faux-finishes and sponge or stippling effects can be used to simulate a stone or brick veneer around a plain MDF veneer, but this is more time-consuming and requires multiple practice applications on scrap material initially.
Whatever process you adopt, first do a little trial piece on some obscure part–in the back of the mantel or the underside of a shelf–before you undertake the entire surface.
Can You Paint an Electric Fireplace? What You’ll Need
Tools and materials:
- Mild soap and water or a grease build up degreaser.
- Medium or fine sandpaper (150 -220 grit)
- Tack cloth or lint-free rag.
- Painter’s tape
- Drop cloth
- Primer (bonding primer to glassy or laminate surfaces)
- Paint of your choice (see table above)
- Paintbrush, foam roller or spray gun.
- Dust mask and rubber gloves.
- Screwdriver, should you want to take off trim or hardware.
Step-by-step guide on how to paint an electric fireplace.
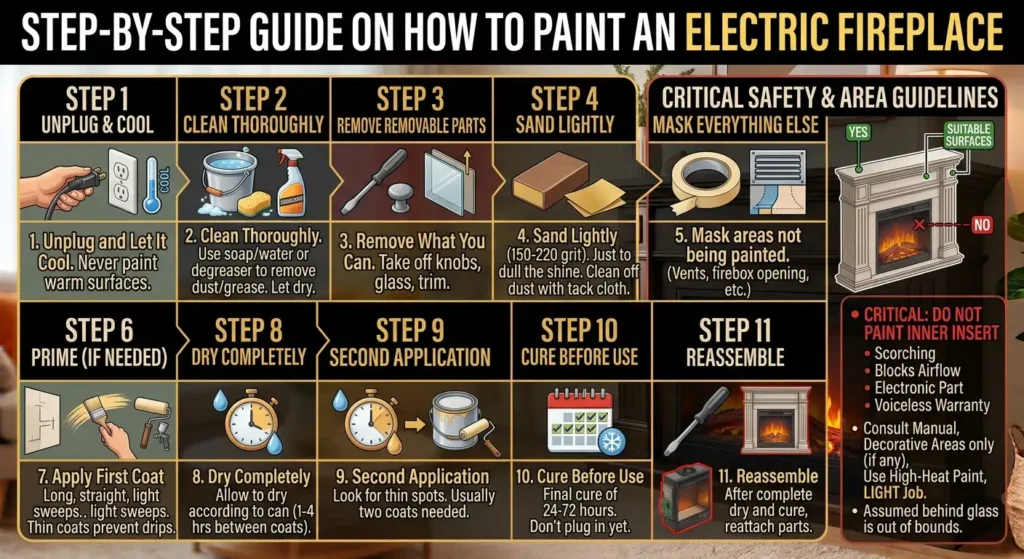
Step 1: Unplug and Let It Cool
Never leave the unit on when beginning to use it and ensure that the unit has not been in use lately. Never paint anything that’s warm to the touch.
Step 2: Clean Thoroughly
Use soapy water or grease remover to wipe down the whole surround to get rid of dust, grease, and residue of smoke. Allow to dry. This is the most frequent cause of paint peeling up afterwards.
Step 3: Remove What You Can
Removal Take off the glass panel and knobs or any other parts that can be removed easily. This safeguards them against overspray and provides you with cleaner lines.
Step 4: Sand Lightly
When the surface is smooth, laminated or already sealed, sharpen it using 150-220 grit sandpaper. You are not peeling the finish off, you are just beating the shine out of it so the paint can have something to cling to. Clean off the dust afterwards with a tack cloth.
Step 5: Mask anything that you are not painting.
Tape the opening of the firebox, vents, and any electronic parts you want to keep paint-free with painter tape.
Step 6: Prime (If Needed)
Slick, laminate or dark surfaces tend to appreciate a coating of bonding primer. This step is unnecessary when you know your paint is designed to be no-prep or self-priming and your surface is already matte and porous.
Step 7: Take the First Coat.
Draw long, straight lines, brush or with spray, light sweeps. Thin coats are not only more evenly dried, but are much less likely to drip or streak, than a thick coat.
Step 8: Dry It to the Last Drop.
Allow to dry with the manufacturer of paint- one to four hours between coats, depending on the weather and the paint.
Second Coat: Make a Second Application.
Majority fireplaces require two coats of paint to have complete coverage. Look at thin spots or streaks and then determine whether or not a third coat is necessary.
Cure Before Use: Before using, the product must be cured.
Allow the last coating to cure the entire time indicated on the can – usually 24-72 hrs – before replacing the plug to the unit or handling the surface extensively.
Step 11: Reassemble
After the paint is completely dry and cured, reattach the glass, trim, and hardware.
Common Mistakes to Avoid
- Painting when the unit is still warm. This is never to be done, as the unit must always be allowed to cool down and then unplugged.
- Omitting the cleaning process. Paint under dust and grease will peel off in a few weeks.
- To use thick coats to save time. This leads to drips, uneven texture and increased time of dryness.
- Painting the vents or heating element. This is the quickest method of making the unit smell of smoke or destroying it.
- Disregard of cure time. prematurely turning on the heater may cause softening of paint that is not completely hard.
- Selecting the incorrect sheen. High-gloss finishes reveal each stroke of the brush and blemish; satin or matte conceals more.
Cost Breakdown
| Item | Estimated Cost |
|---|---|
| Sandpaper and tack cloth | $5–$10 |
| Painter’s tape and drop cloth | $8–$15 |
| Primer (if needed) | $10–$20 |
| Paint (quart to pint, depending on size) | $15–$35 |
| Brushes/roller or spray gun | $8–$25 |
| Total estimated project cost | $20–$80 |
A refresh that is relatively inexpensive in a living room is a repaint compared to replacing an electric fireplace, which can cost as much as 200-1500 or more to buy a new one.
How to Maintain a Newly Painted Electric Fireplace?
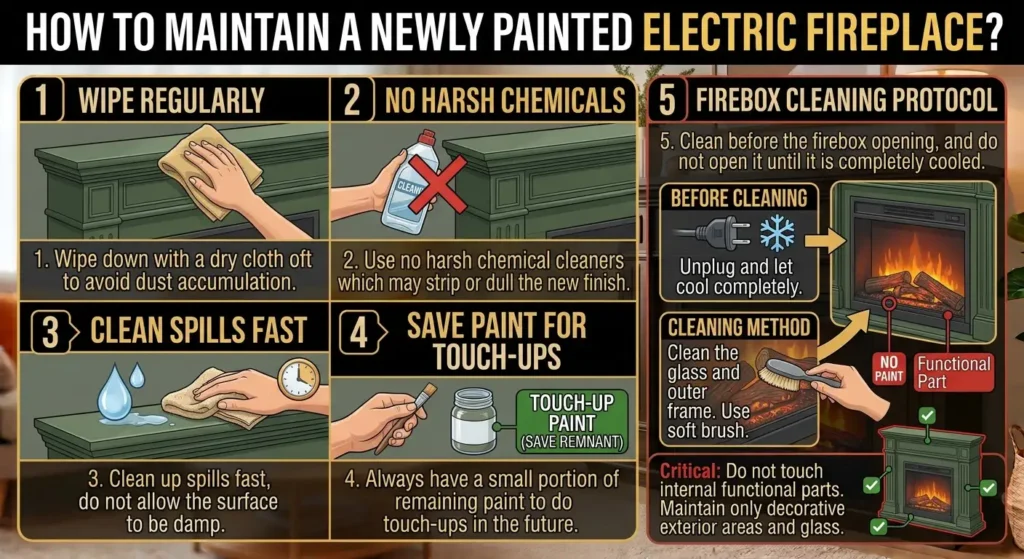
- Wipe down with a dry cloth often to avoid dust accumulation.
- Use no harsh chemical cleaners which may strip or dull the new finish.
- Clean up spills fast, do not allow the surface to be damp.
- Always have a small portion of remaining paint to do touch-ups in the future.
- Clean before the firebox opening, and do not open it until it is completely cooled.
You May Also Read:
- Electric Fireplace Breaker Requirements? 7 Essential Safety Rules
- Can You Have Two Fireplaces on One Chimney? 7 Essential Safety Tips
FAQs:
Painting an electric fireplace insert?
The outer housing of the insert can be painted, but not the internal heating element, vents, glass or LED components.
Will you require special heat-resistant paint on an electric fireplace?
Metal trim or surfaces near the heater vents only. Standard furniture-grade paint is usually all that is required of the mantel and the surround.
Is it possible to make an electric fireplace black?
Yes, one of the most popular finishes to update the appearance of an electric fireplace is matte black.
Will the heater be able to smell of paint?
When the right paint is used, allowed to dry, and nothing is painted in the area of the vents, there should be very little or no odor.
Is it possible to spray paint an electric fireplace?
Yes, spray paint will most frequently provide the smoothest and even finish, particularly on trim and metal accents.
How a fireplace with electricity requires so many coats of paint?
Majority of projects require two coats to cover completely.
Should you sand prior to painting?
On glossy or laminate surfaces or previously sealed surfaces, it is recommended to be lightly sanded in order to have the paint stick on.
Will you be able to paint laminate or veneer fireplace surrounds?
Yes, and with a bonding primer, which is made to stick to slick surfaces.
What is the time required by painted paint to dry before you can resume using the fireplace?
The majority of paints require 24 to 72 hours to completely dry out – refer to the label of your product.
Painting the glass on an electric fireplace is possible?
It’s not recommended. Heat cycling can crack or peel painted glass.
Is it possible to make an electric fireplace change color without taking it off the wall?
Yes, provided you are able to reach and tape off the nearby area safely.
My Final Thoughts:
An electric fireplace can be painted over realistic, economical, and a weekend project provided that you do not cross the boundary separating furniture and electrical component. Wipe down, fill in sand, use a paint that matches the surface and clean the heater, vents, glass, and LED screen of any paint. Do so, and you will have a fireplace that appears new – without incurring even a fraction of the expense a replacement would cost.