Can You Convert a Gas Fireplace to Electric? Yes — Here Is the Safe Way to Do It
Can you convert a gas fireplace to electric? Yes. It is one of the most common fireplace upgrades homeowners make when they want the look of a fire without the gas bills, the pilot light, or the maintenance.
The swap is simpler than most people expect. A licensed professional shuts off and seals the gas supply, and then you set an electric fireplace insert into the old firebox. No venting is needed. No chimney work is needed. You get LED flames, adjustable heat, and a remote control — and you never touch a gas line yourself.
Safety note: gas is never a DIY material. Turning the shutoff valve off is fine. Everything beyond that — disconnecting, capping, sealing, or removing gas parts — belongs to a licensed gas fitter or HVAC professional. If you ever smell gas, leave the house and call your gas utility or emergency services from outside. Renters: get written landlord approval first, and check local permits and building codes.
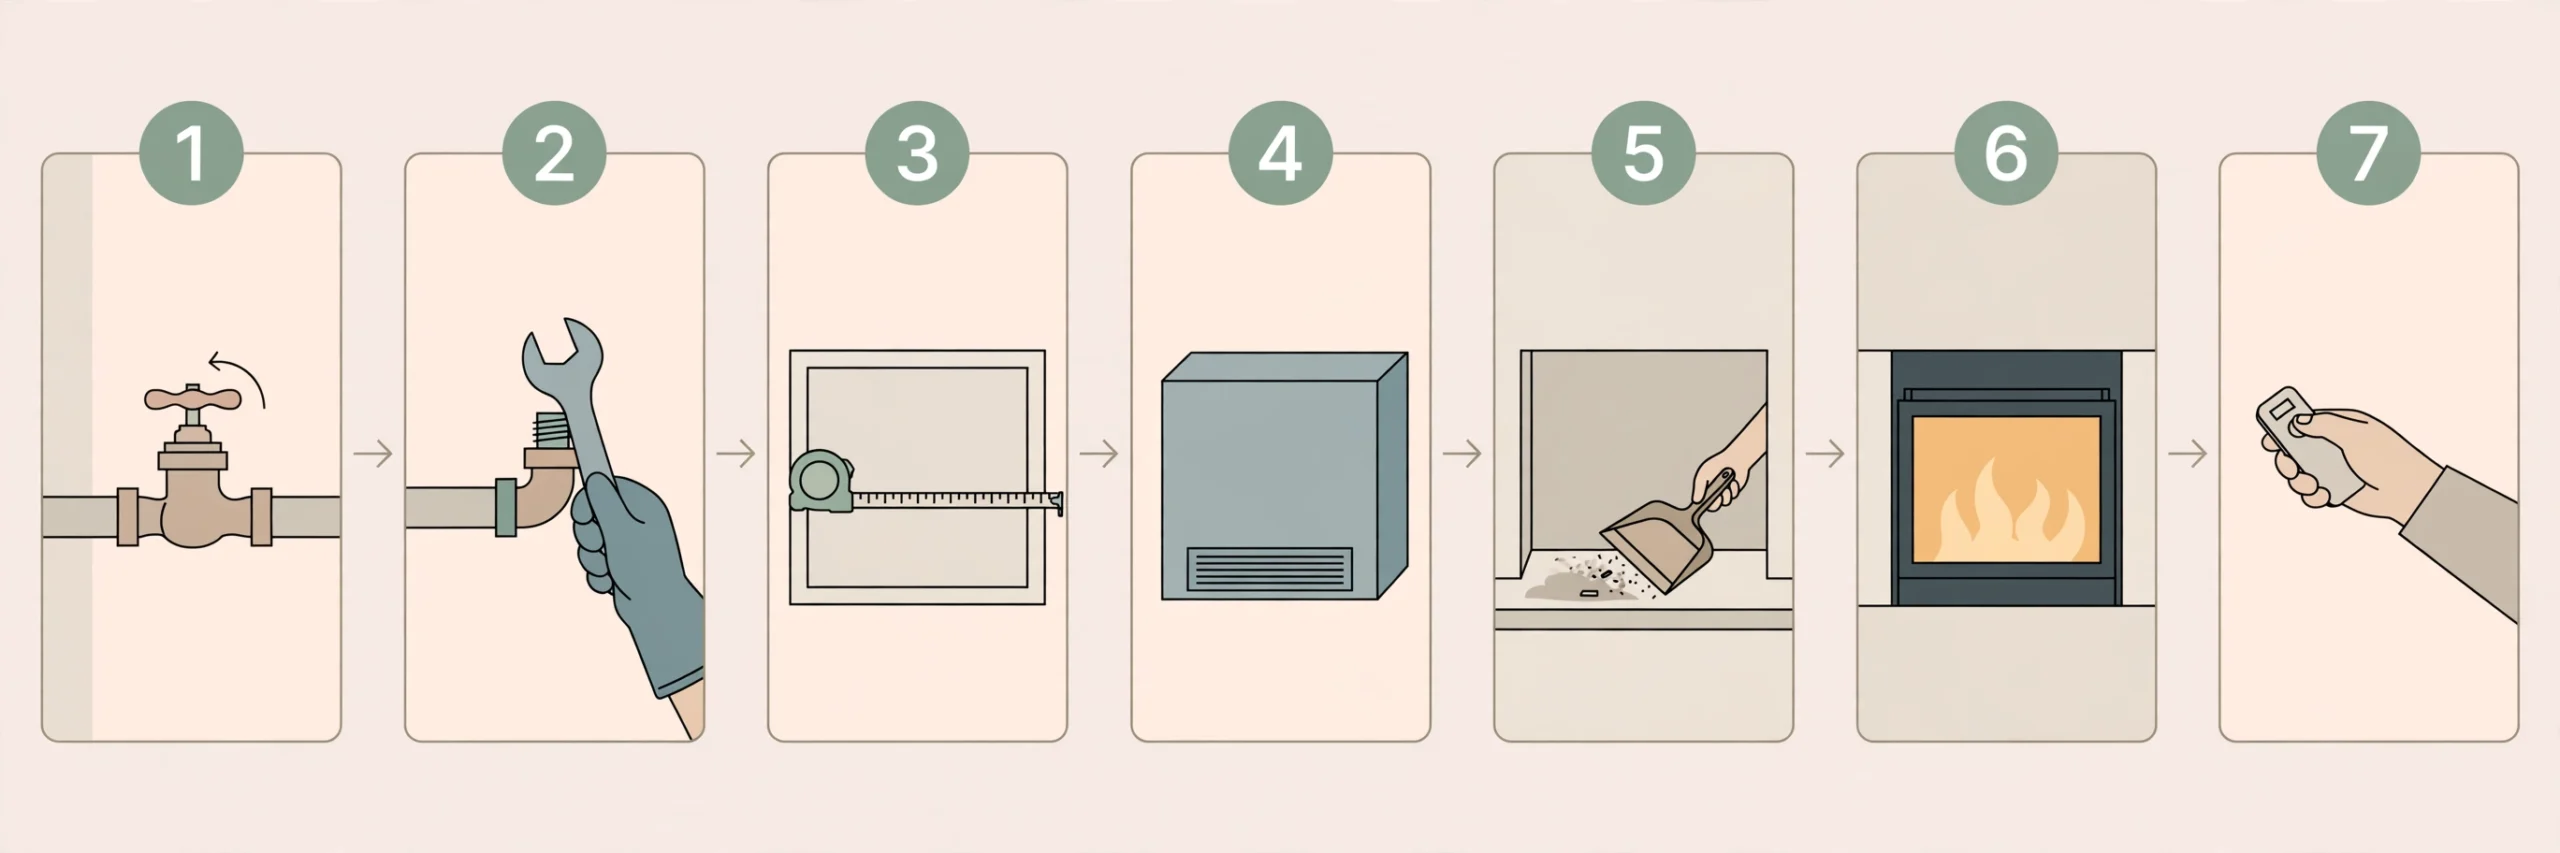
- Shut off the gas supply valve.
- Schedule a licensed gas fitter to cap the gas line.
- Measure the firebox opening, not the frame.
- Pick an electric insert that fits the opening.
- Vacuum the firebox clean before the new insert arrives.
- Slide the electric insert into the firebox.
- Close the damper and run a full test.
1. Shut off the gas supply valve
Find the gas shutoff valve near your fireplace — usually a small handle or knob on the gas line running to the firebox. Turn it to the closed position (perpendicular to the pipe on most quarter-turn valves).
This is the one gas step you can do yourself, and it makes the fireplace inert while you plan the rest. If you cannot find the valve, do not guess: call your gas fitter early and let them locate it for you.
2. Schedule a licensed gas fitter to cap the gas line
Book the fitter before you buy anything. They will disconnect the burner, pull the old gas logs and fittings, and cap the supply line with a gas-rated sealant and iron cap — ideally back in the system, away from the firebox.
The fitter also leak-tests the sealed connection, usually with a meter or soapy solution, and confirms the line is airtight. Prices vary by region, so get a quote up front. Keep the receipt: it documents code-compliant work for your insurer and any future buyer.
3. Measure the firebox opening, not the frame
Measure the inside of the firebox: width, height, and depth, in inches. Write all three down. The decorative frame and surround are bigger than the actual opening, and shopping from frame measurements is how people end up with inserts that do not fit.
Note anything odd while you measure — sloped sides, a raised floor, or a gas stub that the fitter will cap. Those details decide which insert shape works. If you are weighing electric against keeping gas, this gas vs electric fireplace comparison lays out the trade-offs side by side.
4. Pick an electric insert that fits the opening
Shop for an insert whose dimensions are 1–2 inches smaller than your firebox measurements on every side. That margin leaves room for filler panels and air flow, and it hides rough edges behind the trim.
Match the power type to your home: most inserts plug into a standard 120-volt outlet, while larger hardwired models run on 240 volts. One honest catch — the small electrical connection already in many gas fireplaces (for a pilot starter or blower) almost never supports a 1,500-watt heater. If no suitable outlet sits near the firebox, plan an electrician visit for a dedicated circuit. This guide to installing an electric fireplace explains the power choices in more detail.
5. Vacuum the firebox clean before the new insert arrives
Gas fireboxes collect soot, dust, and small debris over the years. Vacuum every surface with a brush attachment, then wipe down reachable areas with a damp cloth.
A clean cavity lets the insert sit level and keeps old soot off the heater’s air intake. It also gives you a final clear look at the fitter’s cap — if you see or smell anything unusual, stop and call the gas utility before continuing.
6. Slide the electric insert into the firebox
Set the insert on a drop cloth in front of the fireplace, connect any trim panels per the manual, and slide the unit straight into the cleaned firebox. It should sit level and centered, with the power cord routed to the outlet without pinching.
Most inserts need no fasteners — their weight holds them in place. Fill side gaps with your non-combustible panels and seal edges with high-heat caulk so the finished front looks built-in. Curious how the heat actually works once it is in? Here is how electric fireplaces produce heat and flames.
7. Close the damper and run a full test
Electric inserts need no venting, so close the fireplace damper (or seal the flue) to keep warm air from escaping up the chimney and cold drafts from sliding down. This one move noticeably improves how well the insert heats the room.
Plug in, power on, and test every setting: flame only, low heat, high heat, thermostat, timer, and remote. Run the heater for 20–30 minutes and confirm steady heat with no burning smell beyond a faint first-use odor. If your setup involves a new circuit, these electric fireplace code requirements are worth a quick read.
| The insert will not turn on | Confirm it is plugged in fully, the outlet has power, and the breaker has not tripped. Check the insert’s own power switch too. |
| The room does not feel warm | Set the heater to high, angle the outlet toward the room, and make sure big appliances are not sharing the same circuit. |
| You see gaps around the insert | Re-measure the opening and add filler panels or a trim kit sized for inserts. Seal the edges with high-heat caulk. |
| You smell gas at any point | Do not flip switches or light anything. Leave the house and call your gas utility or emergency services from outside. |
Do I really need a professional for this conversion?
Yes, for the gas side. Only a licensed gas fitter or HVAC professional should disconnect, cap, or seal a gas line. You can handle the measuring, cleaning, and insert installation yourself once the gas is made safe.
Does the chimney or vent stay open after the conversion?
No. Electric inserts need no venting. Close the damper or seal the flue so warm room air does not escape up the chimney and cold drafts do not come down.
Will the electric insert heat as well as my gas fireplace?
Usually not as strongly. Electric inserts generally put out less heat than gas units, but they offer adjustable settings, realistic LED flames, and safer operation with little upkeep.
Can I plug the electric insert into a normal outlet?
Many plug-in inserts run on a standard 120-volt outlet. Larger models near 1,500 watts sit close to the limit of a 15-amp circuit, so a dedicated circuit is the safer choice. Ask a licensed electrician.
Do I need a permit to convert a gas fireplace to electric?
It depends on your area. Gas-line capping and new electrical circuits often trigger permit and code requirements, so check with your local building department before work starts. Renters also need written landlord approval.
Need: right-sized electric insert, tape measure, vacuum, screwdrivers, filler panels, high-heat caulk, 120V outlet or electrician, licensed gas fitter.
- Shut off the gas valve yourself.
- Fitter disconnects, caps, and leak-tests the gas line.
- Measure the firebox interior (W × H × D).
- Buy an insert 1–2″ smaller on every side.
- Vacuum and wipe the firebox clean.
- Slide in the insert, add trim, caulk edges.
- Close the damper, test all heat and flame settings.
Converting a gas fireplace to electric gives you the fire you love without the fuel, the pilot light, or the maintenance schedule. The secret to doing it safely is a clear split: the fitter owns the gas, you own everything after.
Once your new insert is humming, a quick check of these vented and ventless gas fireplace basics helps explain what you left behind — and why you will not miss the venting.